Solution
The following paper can be loaded in the multi-purpose tray.
| Paper Type | Paper Size |
Plain Paper (60 - 89 g/m ) )
Heavy Paper (90 - 163 g/m ) ) | A4, B5, A5, Legal, Letter, Executive, 16K |
| Custom Paper Size (Width 76.2 to 215.9 mm; Length 127.0 to 355.6 mm) |
| Transparency | A4, Letter |
| Label | A4, Letter |
| Envelope | Envelope DL, Envelope COM10, Envelope C5, Envelope Monarch |
Loading Standard Size Paper (Other Than Envelopes)
1. Fold up the tray cover, and then pull out the rear paper guide.
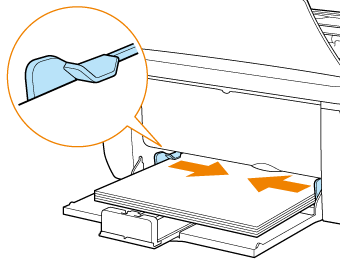
2. Spread the paper guides a little wider than the actual paper width.
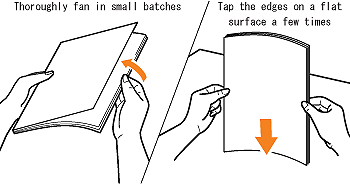
3. Before loading transparencies or labels, fan them in small batches and align the edges.
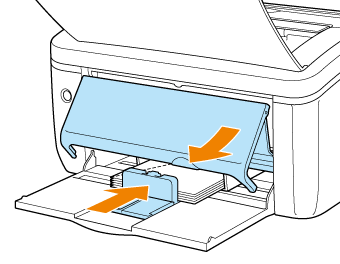
4. Gently load the paper stack until it touches the back of the tray.
Be sure that the paper stack is loaded under the load limit guides.
5. Align the paper guides with the width of the paper.
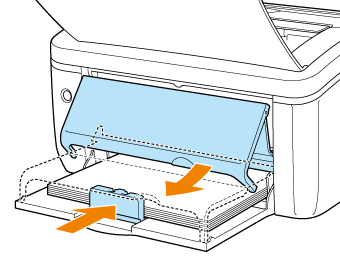
6. Align the rear paper guide with the paper, and then extend the tray cover.
Loading paper is now completed.
NOTE
If paper runs out and is refilled, the Paper indicator blinks. Pressing the Paper key resumes printing.
1. Fold up the tray cover, and then pull out the rear paper guide.
2. Spread the paper guides a little wider than the actual paper width.
3. Gently load the paper stack until it touches the back of the tray.
Be sure that the paper stack is loaded under the load limit guides.
4. Align the paper guides with the width of the paper.
5. Align the rear paper guide with the paper, and then extend the tray cover.
Loading paper is now completed.
NOTE
If paper runs out and is refilled, the Paper indicator blinks. Pressing the Paper key resumes printing.
Loading Custom Size Paper (Non-Standard Paper)
1. Fold up the tray cover, and then pull out the rear paper guide.
2. Spread the paper guides a little wider than the actual paper width.
3. Gently load the paper stack until it touches the back of the tray.
Be sure that the paper stack is loaded under the load limit guides.
4. Align the paper guides with the width of the paper.
5. Align the rear paper guide with the paper, and then extend the tray cover.
Loading paper is now completed.
NOTE
If paper runs out and is refilled, the Paper indicator blinks. Pressing the Paper key resumes printing.
Register the size of the loaded custom size paper using the following procedure.
If printing custom size paper, you need to register the custom paper size in the printer driver previously.
IMPORTANT
A user without administrator rights cannot register the custom paper size. Be sure to log on as a user with administrator rights before registering the custom paper size.
If you are not sure about the permissions, ask your computer administrator.
6. Display the [Printers and Faxes] folder or the [Printers] folder.
From the [Start] menu, select [Settings] > [Printers].
From the [Start] menu, select [Printers and Faxes].
From the [Start] menu, select [Control Panel], and then click [Printers and Other Hardware] > [Printers and Faxes].
From the [Start] menu, select [Control Panel], and then click [Printer].
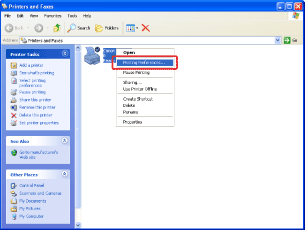
7. Right-click the icon for this printer, then select [Printing Preferences] from the pop-up menu.
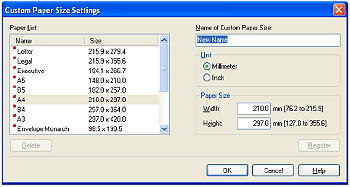
8. Display the [Page Setup] sheet (1), then click [Custom Paper Size] (2).
9. Specify the following options as needed.
[Paper List]: Displays [Name] and [Size] of standard paper sizes and added custom paper sizes.
[Name of Custom Paper Size]: Enter the name of the custom paper size to be added. Up to 31 characters can be entered.
[Unit]: Select the unit to be used when setting the custom paper size.
[Paper Size]: Specify the height and width of the custom paper size.size. Specify the custom paper size in portrait
orientation ([Height]

[Width]) within user-definable sizes.
10. Click [Register].
NOTE
The number of custom paper sizes that can be added depends on the system environment.
11. Confirm the settings, then click [OK].
Precautions on Loading Paper in the Multi-purpose Tray
IMPORTANT
- Be sure to load paper in portrait orientation.
- When printing from the multi-purpose tray, make sure that any paper is not loaded in the manual feed tray. If any paper is loaded in the manual feed tray, feeding paper from the tray is prioritized.
- While printing from the multi-purpose tray, do not load paper in the manual feed tray. The paper loaded in the manual feed tray is fed. Therefore, multiple sheets of paper may be fed at a time, resulting in paper jams.
- If you want to refill paper when any paper still remains in the multi-purpose tray, remove the loaded paper once, align it together with the paper to be refilled by tapping the edges thoroughly, and then load the aligned paper in the multi-purpose tray.
- For the number of sheet for continuous printing, use the load limitations for each paper type as rough guides.
- Be sure to fan the transparencies or labels thoroughly before loading them. If they are not fanned enough, multiple sheets of paper may be fed at once, causing paper jams.
- When fanning or aligning the transparencies, try to hold the edges to avoid touching the printing surface.
- Take care not to mark or stain the printing surface of the transparencies with fingerprints, dust, or oil. This may result in poor print quality.
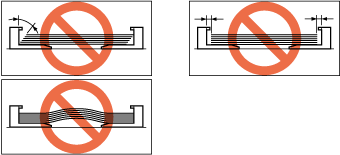
- Load the paper so that it is straight.
- If the rear edge of the paper stack is not properly aligned, this may result in misfeeds or paper jams.
- If the paper is curled or folded at corners, flatten it before loading it in the printer.
- If you use paper that has been poorly cut, multiple sheets of paper may be fed at once. In this case, fan the paper thoroughly, and then align the edges of the stack properly on a hard, flat surface.
- You cannot print on the reverse side (glued side) of envelopes.
- Be sure to align the paper guides with the width of the paper. If the paper guides are too loose or too tight, this may result in misfeeds or paper jams.
NOTE
- To print paper with letterheads or logos, load the paper with the printing side facing up as follows.
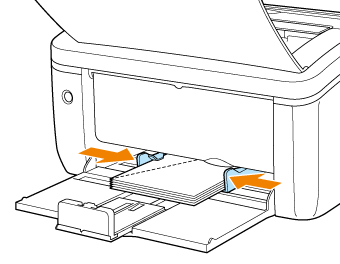
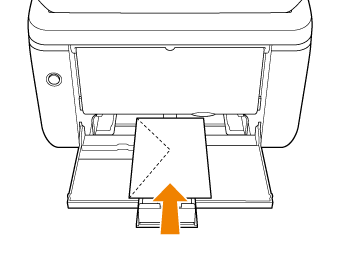
- To print envelopes, load the paper with the printing side facing up as follows.
Load the envelopes so that the flap is toward the left of the printer when viewed from the front.
- The following shows the paper capacity of the multi-purpose tray.
- Plain paper (Ex. 64 g/m

): Approx. 250 sheets
- Heavy paper (Ex. 128 g/m

): Approx. 100 sheets
- Transparency: Approx. 50 sheets
- Label: Approx. 10 sheets
Make sure that there is sufficient space between the load limit guides and the paper stack. If there is no space, slightly reduce the amount of paper.
- Before loading envelopes, flatten curls as follows.
1. Place the envelopes on a flat surface, and then flatten them to release any remaining air.
2. Be sure that the edges are pressed tightly.
3. Press any stiff corners of the envelopes to flatten the curls.
 )
) )
)







 [Width]) within user-definable sizes.


 ): Approx. 250 sheets
 ): Approx. 100 sheets