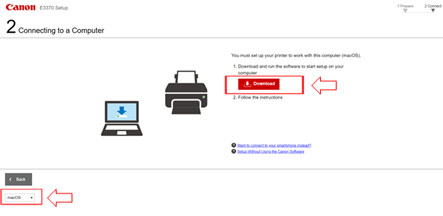
macOS Compatibility List for Inkjet Printer / Scanner
macOS Compatibility List for Inkjet Printer / Scanner
List of Products Supported
MAXIFY Series | MAXIFY GX Series | PIXMA E Series | PIXMA G Series | PIXMA GM Series | PIXMA iP Series | PIXMA iX Series | PIXMA MG Series | PIXMA MP Series | PIXMA MX Series | PIXMA TR Series | PIXMA TS Series | PRO Series | Scanner | WG Series
MAXIFY Series
| Model Name | macOS 14 (Sonoma) | macOS 15 (Sequoia) | macOS 26 (Tahoe) |
| MAXIFY iB4070 | Not Supported | Not Supported | Not Supported |
| MAXIFY iB4170 | Install Printer Driver (CUPS Driver) | AirPrint™ | AirPrint™ |
| MAXIFY MB5070 | Not Supported | Not Supported | Not Supported |
| MAXIFY MB5170 | Install Printer Driver (CUPS Driver) | Install Printer Driver (CUPS Driver) | Install Printer Driver (CUPS Driver) |
| MAXIFY MB5370 | Not Supported | Not Supported | Not Supported |
| MAXIFY MB5470 | Install Printer Driver (CUPS Driver) | Install Printer Driver (CUPS Driver) | Install Printer Driver (CUPS Driver) |
For instruction to print via AirPrint™, please click here.
MAXIFY GX Series
| Model Name | macOS 14 (Sonoma) | macOS 15 (Sequoia) | macOS 26 (Tahoe) |
| MAXIFY GX1070 | AirPrint™ | AirPrint™ | AirPrint™ |
| MAXIFY GX2070 | AirPrint™ | AirPrint™ | AirPrint™ |
| MAXIFY GX3070 | AirPrint™ | AirPrint™ | AirPrint™ |
| MAXIFY GX4070 | AirPrint™ | AirPrint™ | AirPrint™ |
| MAXIFY GX5070 | AirPrint™ | AirPrint™ | AirPrint™ |
| MAXIFY GX5170 | AirPrint™ | AirPrint™ | |
| MAXIFY GX5570 | AirPrint™ | AirPrint™ | AirPrint™ |
| MAXIFY GX6070 | AirPrint™ | AirPrint™ | AirPrint™ |
| MAXIFY GX6570 | AirPrint™ | AirPrint™ | AirPrint™ |
| MAXIFY GX7070 | AirPrint™ | AirPrint™ | AirPrint™ |
| MAXIFY GX7170 | AirPrint™ | AirPrint™ |
For instruction to print via AirPrint™, please click here.
PIXMA E Series
| Model Name | macOS 14 (Sonoma) | macOS 15 (Sequoia) | macOS 26 (Tahoe) |
| PIXMA E400 | Not Supported | Not Supported | Not Supported |
| PIXMA E410 | Install Printer Driver (CUPS Driver) | Install Printer Driver (CUPS Driver) | Install Printer Driver (CUPS Driver) |
| PIXMA E470 | Install Printer Driver (CUPS Driver) | Install Printer Driver (CUPS Driver) | Install Printer Driver (CUPS Driver) |
| PIXMA E480 | Not Supported | Not Supported | Not Supported |
| PIXMA E510 | Install Printer Driver (CUPS Driver) | Install Printer Driver (CUPS Driver) | Install Printer Driver (CUPS Driver) |
| PIXMA E560 | Install Printer Driver (CUPS Driver) | Install Printer Driver (CUPS Driver) | Install Printer Driver (CUPS Driver) |
| PIXMA E610 | Not Supported | Not Supported | Not Supported |
| PIXMA E3170 | AirPrint™ | AirPrint™ | Not Supported |
| PIXMA E3370 | AirPrint™ | AirPrint™ | AirPrint™ |
| PIXMA E3470 | AirPrint™ | AirPrint™ | AirPrint™ |
| PIXMA E4270 | AirPrint™ | AirPrint™ | AirPrint™ |
| PIXMA E4570 | AirPrint™ | AirPrint™ | AirPrint™ |
For instruction to print via AirPrint™, please click here.
PIXMA G Series
| Model Name | macOS 14 (Sonoma) | macOS 15 (Sequoia) | macOS 26 (Tahoe) |
| PIXMA G570 | AirPrint™ | AirPrint™ | AirPrint™ |
| PIXMA G670 | AirPrint™ | AirPrint™ | AirPrint™ |
| PIXMA G1000 | Install Printer Driver (CUPS Driver) | Install Printer Driver (CUPS Driver) | Install Printer Driver (CUPS Driver) |
| PIXMA G1010 | Not Supported | Not Supported | Not Supported |
| PIXMA G1020 | AirPrint™ | AirPrint™ | AirPrint™ |
| PIXMA G1030 | AirPrint™ | AirPrint™ | AirPrint™ |
| PIXMA G1730 | AirPrint™ | AirPrint™ | AirPrint™ |
| PIXMA G1737 | AirPrint™ | AirPrint™ | AirPrint™ |
| PIXMA G2000 | Install Printer Driver (CUPS Driver) | Install Printer Driver (CUPS Driver) | Install Printer Driver (CUPS Driver) |
| PIXMA G2010 | Not Supported | Not Supported | Not Supported |
| PIXMA G2020 | AirPrint™ | AirPrint™ | AirPrint™ |
| PIXMA G2060 | AirPrint™ | AirPrint™ | AirPrint™ |
| PIXMA G2730 | AirPrint™ | AirPrint™ | AirPrint™ |
| PIXMA G2770 | AirPrint™ | AirPrint™ | AirPrint™ |
| PIXMA G3000 | Install Printer Driver (CUPS Driver) | Install Printer Driver (CUPS Driver) | Install Printer Driver (CUPS Driver) |
| PIXMA G3010 | Not Supported | Not Supported | Not Supported |
| PIXMA G3020 | AirPrint™ | AirPrint™ | AirPrint™ |
| PIXMA G3060 | AirPrint™ | AirPrint™ | AirPrint™ |
| PIXMA G3730 | AirPrint™ | AirPrint™ | AirPrint™ |
| PIXMA G3770 | AirPrint™ | AirPrint™ | AirPrint™ |
| PIXMA G3780 | AirPrint™ | AirPrint™ | AirPrint™ |
| PIXMA G4000 | Install Printer Driver (CUPS Driver) | Install Printer Driver (CUPS Driver) | Install Printer Driver (CUPS Driver) |
| PIXMA G4010 | AirPrint™ | AirPrint™ | AirPrint™ |
| PIXMA G4770 | AirPrint™ | AirPrint™ | AirPrint™ |
| PIXMA G4780 | AirPrint™ | AirPrint™ | AirPrint™ |
| PIXMA G5070 | AirPrint™ | AirPrint™ | AirPrint™ |
| PIXMA G6070 | AirPrint™ | AirPrint™ | AirPrint™ |
| PIXMA G7070 | AirPrint™ | AirPrint™ | AirPrint™ |
For instruction to print via AirPrint™, please click here.
PIXMA GM Series
| Model Name | macOS 14 (Sonoma) | macOS 15 (Sequoia) | macOS 26 (Tahoe) |
| PIXMA GM2070 | Not Supported | Not Supported | Not Supported |
| PIXMA GM4070 | Not Supported | Not Supported | Not Supported |
PIXMA iP Series
| Model Name | macOS 14 (Sonoma) | macOS 15 (Sequoia) | macOS 26 (Tahoe) |
| PIXMA iP100 | Not Supported | Not Supported | Not Supported |
| PIXMA iP110 | Install Printer Driver (CUPS Driver) | Install Printer Driver (CUPS Driver) | Not Supported |
| PIXMA iP2770 | Install Printer Driver (CUPS Driver) | Install Printer Driver (CUPS Driver) | Install Printer Driver (CUPS Driver) |
| PIXMA iP2772 | Install Printer Driver (CUPS Driver) | Install Printer Driver (CUPS Driver) | Install Printer Driver (CUPS Driver) |
| PIXMA iP2870 | Not Supported | Not Supported | Not Supported |
| PIXMA iP7270 | Install Printer Driver (CUPS Driver) | Install Printer Driver (CUPS Driver) | Install Printer Driver (CUPS Driver) |
| PIXMA iP8770 | Install Printer Driver (CUPS Driver) | Install Printer Driver (CUPS Driver) | Install Printer Driver (CUPS Driver) |
PIXMA iX Series
| Model Name | macOS 14 (Sonoma) | macOS 15 (Sequoia) | macOS 26 (Tahoe) |
| PIXMA iX6560 | Not Supported | Not Supported | Not Supported |
| PIXMA iX6770 | Install Printer Driver (CUPS Driver) | Install Printer Driver (CUPS Driver) | Install Printer Driver (CUPS Driver) |
| PIXMA iX6870 | Install Printer Driver (CUPS Driver) | Install Printer Driver (CUPS Driver) | Install Printer Driver (CUPS Driver) |
PIXMA MG Series
| Model Name | macOS 14 (Sonoma) | macOS 15 (Sequoia) | macOS 26 (Tahoe) |
| PIXMA MG2470 | Install Printer Driver (CUPS Driver) | Install Printer Driver (CUPS Driver) | Install Printer Driver (CUPS Driver) |
| PIXMA MG2570 | Install Printer Driver (CUPS Driver) | Install Printer Driver (CUPS Driver) | Install Printer Driver (CUPS Driver) |
| PIXMA MG2570S | Install Printer Driver (CUPS Driver) | Install Printer Driver (CUPS Driver) | Install Printer Driver (CUPS Driver) |
| PIXMA MG2970 | Not Supported | Not Supported | Not Supported |
| PIXMA MG3070 | Install Printer Driver (CUPS Driver) | Install Printer Driver (CUPS Driver) | Install Printer Driver (CUPS Driver) |
| PIXMA MG3270 | Not Supported | Not Supported | Not Supported |
| PIXMA MG3570 | Not Supported | Not Supported | Not Supported |
| PIXMA MG3670 | Install Printer Driver (CUPS Driver) | Install Printer Driver (CUPS Driver) | Install Printer Driver (CUPS Driver) |
| PIXMA MG4270 | Not Supported | Not Supported | Not Supported |
| PIXMA MG5470 | Not Supported | Not Supported | Not Supported |
| PIXMA MG5570 | Not Supported | Not Supported | Not Supported |
| PIXMA MG5670 | Not Supported | Not Supported | Not Supported |
| PIXMA MG5770 | Install Printer Driver (CUPS Driver) | Install Printer Driver (CUPS Driver) | Not Supported |
| PIXMA MG6470 | Not Supported | Not Supported | Not Supported |
| PIXMA MG6670 | Not Supported | Not Supported | Not Supported |
| PIXMA MG7170 | Not Supported | Not Supported | Not Supported |
| PIXMA MG7570 | Not Supported | Not Supported | Not Supported |
| PIXMA MG7770 | Not Supported | Not Supported | Not Supported |
PIXMA MP Series
| Model Name | macOS 14 (Sonoma) | macOS 15 (Sequoia) | macOS 26 (Tahoe) |
| PIXMA MP237 | Install Printer Driver (CUPS Driver) | Install Printer Driver (CUPS Driver) | Install Printer Driver (CUPS Driver) |
| PIXMA MP287 | Install Printer Driver (CUPS Driver) | Install Printer Driver (CUPS Driver) | Install Printer Driver (CUPS Driver) |
PIXMA MX Series
| Model Name | macOS 14 (Sonoma) | macOS 15 (Sequoia) | macOS 26 (Tahoe) |
| PIXMA MX397 | Not Supported | Not Supported | Not Supported |
| PIXMA MX477 | Install Printer Driver (CUPS Driver) | Install Printer Driver (CUPS Driver) | Install Printer Driver (CUPS Driver) |
| PIXMA MX497 | Install Printer Driver (CUPS Driver) | Not Supported | Not Supported |
| PIXMA MX537 | Install Printer Driver (CUPS Driver) | Install Printer Driver (CUPS Driver) | Install Printer Driver (CUPS Driver) |
| PIXMA MX727 | Not Supported | Not Supported | Not Supported |
| PIXMA MX927 | Not Supported | Not Supported | Not Supported |
PIXMA TR Series
| Model Name | macOS 14 (Sonoma) | macOS 15 (Sequoia) | macOS 26 (Tahoe) |
| PIXMA TR150 | AirPrint™ | AirPrint™ | AirPrint™ |
| PIXMA TR160 | AirPrint™ | AirPrint™ | AirPrint™ |
| PIXMA TR4570S | AirPrint™ | AirPrint™ | AirPrint™ |
| PIXMA TR4670 | AirPrint™ | AirPrint™ | AirPrint™ |
| PIXMA TR4670S | AirPrint™ | AirPrint™ | AirPrint™ |
| PIXMA TR8570 | AirPrint™ | AirPrint™ | AirPrint™ |
For instruction to print via AirPrint™, please click here.
PIXMA TS Series
| Model Name | macOS 14 (Sonoma) | macOS 15 (Sequoia) | macOS 26 (Tahoe) |
| PIXMA TS207 | AirPrint™ | AirPrint™ | AirPrint™ |
| PIXMA TS307 | AirPrint™ | AirPrint™ | AirPrint™ |
| PIXMA TS3170 | AirPrint™ | AirPrint™ | AirPrint™ |
| PIXMA TS3370 | AirPrint™ | AirPrint™ | AirPrint™ |
| PIXMA TS3470 | AirPrint™ | AirPrint™ | AirPrint™ |
| PIXMA TS4070 | AirPrint™ | AirPrint™ | |
| PIXMA TS5070 | Install Printer Driver (CUPS Driver) | Install Printer Driver (CUPS Driver) | Install Printer Driver (CUPS Driver) |
| PIXMA TS5170 | AirPrint™ | AirPrint™ | AirPrint™ |
| PIXMA TS5370 | AirPrint™ | AirPrint™ | AirPrint™ |
| PIXMA TS5570 | AirPrint™ | AirPrint™ | |
| PIXMA TS6070 | Not Supported | Not Supported | Not Supported |
| PIXMA TS6370 | AirPrint™ | AirPrint™ | AirPrint™ |
| PIXMA TS7770 | AirPrint™ | AirPrint™ | AirPrint™ |
| PIXMA TS7770A | AirPrint™ | AirPrint™ | AirPrint™ |
| PIXMA TS8070 | Not Supported | Not Supported | Not Supported |
| PIXMA TS8170 | AirPrint™ | AirPrint™ | Not Supported |
| PIXMA TS8270 | AirPrint™ | AirPrint™ | Not Supported |
| PIXMA TS8370 | AirPrint™ | AirPrint™ | AirPrint™ |
| PIXMA TS8870 | AirPrint™ | AirPrint™ | AirPrint™ |
| PIXMA TS9170 | AirPrint™ | AirPrint™ | AirPrint™ |
| PIXMA TS9570 | AirPrint™ | AirPrint™ | AirPrint™ |
For instruction to print via AirPrint™, please click here.
PRO Series
| Model Name | macOS 14 (Sonoma) | macOS 15 (Sequoia) | macOS 26 (Tahoe) |
| PIXMA PRO-1 | Not Supported | Not Supported | Not Supported |
| PIXMA PRO-10 | Install Printer Driver (CUPS Driver) | Install Printer Driver (CUPS Driver) | Install Printer Driver (CUPS Driver) |
| PIXMA PRO-100 | Install Printer Driver (CUPS Driver) | Install Printer Driver (CUPS Driver) | Install Printer Driver (CUPS Driver) |
| PIXMA PRO-200 | AirPrint™ | AirPrint™ | AirPrint™ |
| PIXMA PRO-200S | AirPrint™ | AirPrint™ | AirPrint™ |
| imagePROGRAF PRO-300 | Install Printer Driver (CUPS Driver) | Install Printer Driver (CUPS Driver) | Install Printer Driver (CUPS Driver) |
| PIXMA PRO-310 | AirPrint™ | AirPrint™ | |
| imagePROGRAF PRO-500 | Install Printer Driver (CUPS Driver) | Install Printer Driver (CUPS Driver) | AirPrint™ |
| imagePROGRAF PRO-510 | Install Printer Driver (CUPS Driver) | Install Printer Driver (CUPS Driver) | AirPrint™ |
For instruction to print via AirPrint™, please click here.
Scanner
| Model Name | macOS 14 (Sonoma) | macOS 15 (Sequoia) | macOS 26 (Tahoe) |
| CanoScan LiDE 120 | Not Supported | Not Supported | Not Supported |
| CanoScan LiDE 220 | Install Scanner Driver (ICA Driver) | Install Scanner Driver (ICA Driver) | Install Scanner Driver (ICA Driver) |
| CanoScan LiDE 300 | AirPrint™ | AirPrint™ | AirPrint™ |
| CanoScan LiDE 400 | AirPrint™ | AirPrint™ | AirPrint™ |
For instruction to print via AirPrint™, please click here.
WG Series
| Model Name | macOS 14 (Sonoma) | macOS 15 (Sequoia) | macOS 26 (Tahoe) |
| WG7740 | AirPrint™ | AirPrint™ | Not Supported |
| WG7750F | AirPrint™ | AirPrint™ | Not Supported |


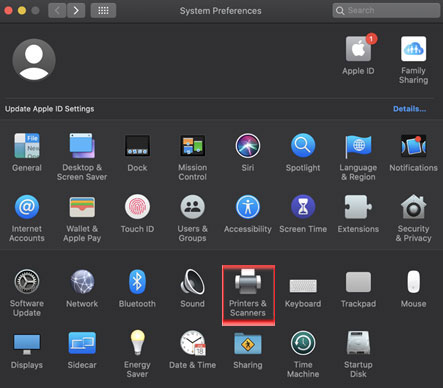
 or choose from Apple menu > System Preferences.