Solution
Load the paper into the drawer.
IMPORTANT
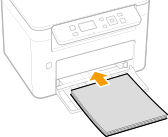
Always load paper in portrait orientation
- Paper cannot be loaded in landscape orientation. Be sure to load paper in portrait orientation, as shown in the illustration below.
1. Open the drawer.
NOTE
- When the drawer is already opened and the paper cover is covered, remove the paper cover.
2. Spread the paper guides apart.
- Slide the paper guides outward.
3. Load the paper and slide it all the way in, until it touches the back side.
- Load the paper in portrait orientation (with the short edge toward the machine) and the print side face up. Paper cannot be loaded in landscape orientation.
- Before loading it, fan the paper stack well, and tap it on a flat surface to align the edges.
- When you insert the paper with <Notify to Check Paper Settings> set to <On>, a confirmation screen is displayed.
IMPORTANT
Keep the paper stack within the load limit guides
- Make sure that the paper stack does not exceed the load limit guides (
 ). Loading too much paper may cause paper jams.
NOTE
- When loading envelopes or preprinted paper, see the "User's Guide" from the Canon website (canon.com/oip-manual).
4. Align the paper guides against the edges of the paper.
- Align the paper guides securely against the edges of the paper.
IMPORTANT
Align the paper guides securely against the paper
- Paper guides that are too loose or too tight may cause misfeeds or paper jams.
5. Replace the paper cover.
NOTE
- When performing printing, open the paper stopper in advance so that the output paper does not fall out of the output tray.
IMPORTANT
When changing the paper size or type
- The factory default settings for paper size and type are <A4> and <Plain>, respectively. If you load a different size or type of paper into the machine, make sure to change the settings. If you do not change the settings, the machine cannot print properly.


 ). Loading too much paper may cause paper jams.


