Zooming in Closer on Subjects when Shooting (PowerShot G9 X Mark II)
12-Dec-2016
8203346200
Solution
When distant subjects are too far away to enlarge using the optical zoom, follow the instructions below.
IMPORTANT
- The following section explains the setting procedures when the camera’s shooting mode has been set to [Program AE] (
 ).
).
When distant subjects are too far away to enlarge using the optical zoom, use digital zoom for up to about 12x enlargement.
Digital zoom cannot be configured in the following shooting modes.
 :Not configurable
| Function | Shooting Mode | ||||||||||||||||||||||||||||
| Digital Zoom |  |  |  |  |  |  |  | SCN |  | ||||||||||||||||||||
 |  |  |  |  |  |  |  |  |  |  |  |  |  |  |  |  |  |  |  |  |  | ||||||||
| Standard | * |  |  |  |  |  |  |  |  |  |  |  |  |  |  |  |  |  |  |  |  |  |  |  |  |  |  |  |  |
| Off | * |  |  |  |  |  |  |  |  |  |  |  |  |  |  |  |  |  |  |  |  |  |  |  |  |  |  |  |  |
| 1.6x/2.0x | * |  |  |  |  |  |  |  |  |  |  |  |  |  |  |  |  |  |  |  |  |  |  |  |  |  |  |  |  |
| *Options vary depending on the assigned shooting mode. | |||||||||||||||||||||||||||||
1.Turn the camera on.
- Press the power button.
- The startup screen is displayed.
2.Access the menu screen.
- Press the [MENU] button.
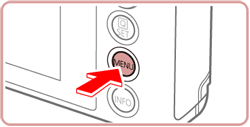
3.Choose [Digital Zoom].
Touch [  ], and then touch [2].
 ], and then touch [2].
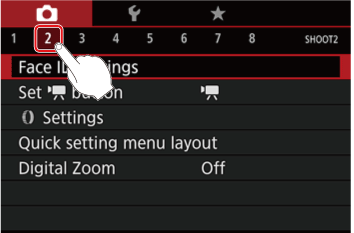
- Touch [Digital Zoom], and then press the
[  ] button.
 ] button.
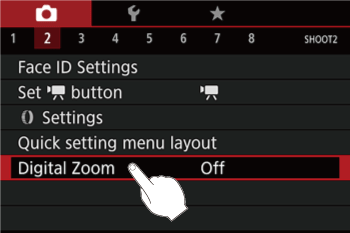

- Touch [Standard] when the screen below is displayed.

4.Move the zoom lever toward [  ].
].
 ].
].- Hold the lever until zooming stops.
- Zooming stops at the largest zoom factor before the image becomes noticeably grainy, which is then indicated on the screen.

5.Move the zoom lever toward [  ] again.
 ] again.
- The camera zooms in even closer on the subject.
- [
 ] is the current zoom factor.

IMPORTANT
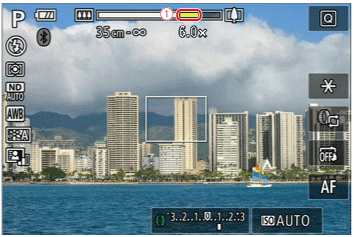
- Moving the zoom lever will display the zoom bar (which indicates the zoom position). The zoom bar is color-coded to indicate the zoom range.
-- White range: optical zoom range where the image will not appear grainy.
-- Yellow range: digital zoom range where the image is not noticeably grainy (ZoomPlus).
-- Blue range: digital zoom range where the image will appear grainy.
- Because the blue range will not be available at some recording pixel settings, the maximum zoom factor can be achieved by following step 1.
NOTE
- Focal length when optical and digital zoom are combined is as follows (35mm film equivalent).
-28 – 336 mm
- To deactivate digital zoom, press the <MENU> button, choose [
 -2 : Digital Zoom], and then choose [Off].
Depending on how you have set the number of recording pixels and the magnification of the [Digital zoom], the [Zoom bar] ( ) may be displayed in yellow (ZoomPlus).
 ) may be displayed in yellow (ZoomPlus).
 - To shoot with the [Digital zoom] without causing the image quality to degrade, please shoot within the range of the ZoomPlus.
With the [Digital Tele-Converter] setting, the focal length of the lens can be increased by approximately 1.6x or 2.0x. This can reduce camera shake because the shutter speed is faster than it would be if you zoomed (including using digital zoom) in to the same zoom factor.
IMPORTANT
- The magnified display will not appear when using the digital zoom.
1.Turn the camera on.
- Press the power button.
- The startup screen is displayed.
2.Access the menu screen.
- Press the [MENU] button.

3.Choose [Digital Zoom].
Touch [  ], and then touch [2].
 ], and then touch [2].

- Touch [Standard], and then press the [
 ] button.


- Touch [1.6x] or [2.0x] to select the setting for the [Digital Zoom].
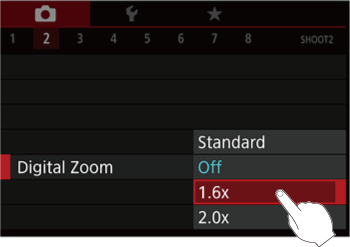
NOTE
- The respective focal lengths when using [1.6x] and [2.0x] are 44.8 - 134.4. mm and 56.0 - 168.0 mm (35mm film equivalent).
- The shutter speed may be equivalent when you move the zoom lever all the way toward (
 ) for maximum telephoto, and when you zoom in to enlarge the subject to the same size using [Digital Zoom].