31-Jul-2015
8202022300
 icon.
icon. icon. 1. Start the web browser on your computer or smartphone and connect to CANON iMAGE GATEWAY (http://canon.com/cig). 2. The CANON iMAGE GATEWAY top page is displayed. If you have already created an account, enter your
  login name (email address) and password, and then click
  [Log in].
 [Sign up] and completed the free registration procedure.
 [E-mail Address] and [Confirm E-mail Address] fields and click [Send].
 3. When the page below is displayed, click [Enter Authentication Code here].
 4. The [Authentication Code] screen is displayed.
  5. Press the < Playback> (
  ) button to turn the camera on. 6. Press the < Wi-Fi > (
  ) button.
 ] button to access the keyboard, and then enter a nickname.
 7. Display the camera’s Wi-Fi menu.
 ][
][  ][
][  ][
][  ] keys or turn the [
  ] dial to choose
  , and then press the [ ] button.
 8. Establish a connection with an access point. ][ ] buttons or turn the [ ] dial to choose [Authenticate], and then press the [ ] button.
 9. Choose an access point. ][ ] buttons or turn the [ ] dial to choose a network (access point), and then press the [ ] button.
 10. Enter the access point password.
 Press the [ ] button to access the keyboard, and then enter the password
 Press the [ ][ ] buttons or turn the [ ] dial to choose [Next], and then press the [ ] button.
 11. Choose [Auto] and establish the connection. ][ ] buttons or turn the [ ] dial to choose [Auto], and then press the [ ] button.
 12. Once the camera is connected to CANON iMAGE GATEWAY via the access point, an authentication code is displayed.
 13. On the computer, enter the authentication code displayed on the camera and click [send].
 14. Press the [ ][ ] buttons or turn the [ ] dial to choose [OK], and then press the [ ] button.
 15. A six-digit confirmation number is displayed on the computer.
 16. A confirmation number is also displayed on the camera. ] button.
 17. When [A Camera was detected] appears, click [Next].
 18. The [Web Service Settings] screen appears.
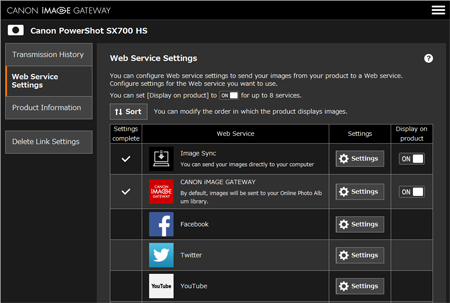 19. The camera display will return to the Wi-Fi menu, and the [
  ] icon changes to [
  ].
]. 20. Press the [ ] button or turn the [ ] dial. [
  ] and the CANON iMAGE GATEWAY icon will be added.
 1. When the following screen appears, click the [Web Service Settings] tab appearing on the left side of the screen to display the list of available web services.
 2. Configure the Web service you want to use.
 3. After you have completed settings for Twitter,
  will be displayed in the [Settings Complete] column located to the left of the [Web Service] column for Twitter. 4. Set the [ON/OFF] switch in the [Display on camera] column on the right side of the screen to [ON] for Twitter. 5. On the camera’s Wi-Fi menu, choose
  and then press the [ ] button to update the Web service settings. 6. A screen like the following one will be displayed and the Web service settings will be updated.
 7. After the update process is complete and a connection to the network is made, the Twitter icon will be displayed on the screen.
 1. Choose the desired Web service. In this example, the procedures are shown for Twitter. ][ ][ ][ ] buttons to choose the desired Web service’s icon, and then press the [ ] button. ][ ] buttons, and then press the [ ] button. ][ ] buttons to choose [Add an Access Point], and then press the [ ] button. A list of detected access points will be displayed. For more information on the connection procedure, please refer to step 5 in Sending images to a computer (Wi-Fi function) . 2. The following screen will be displayed.
 3. When the connection is made, the screen for sending images will appear. To send the image shown, choose [Send this image] and then press the [ ] button. ][ ] buttons to choose [Select and send], and then press the [ ] button to select the desired images.
 4. The [Image Transfer] screen will appear when images are sent.
 5. After the images have been send, the screen below will be displayed. Press the [ ] button to end the connection.
 ] button. The recent target device is listed first, so you can easily connect again by pressing the [ ][ ] buttons to choose it. To add a new device, display the device selection screen by pressing the [ ][ ] buttons, and then configure the setting.