Solution
When shooting a scene having both bright and dark areas, use the <

> (HDR Backlight Control) mode. When you take one picture in this mode, three continuous shots are taken at different exposures. This results in one image, with a wide tonal range, that has minimized the blocked-up shadows caused by backlighting.
* HDR stands for High Dynamic Range.
NOTE
<

>: (HDR Backlight Control) mode. /

: JPEG Large, Fine /

: RAW / <

><

>: Cross keys / <

>: Setting button <

>: Main Dial / <

>: Quick Control button
*The icons and markings indicating the camera’s buttons, dials, and settings correspond to the icons and markings on the camera and on the LCD monitor.
IMPORTANT
- This camera can only utilize the HDR setting when set to <
 > mode. HDR cannot be used in other modes.
- Note that the image may not be rendered with a smooth gradation and may look irregular or have significant noise.
- HDR Backlight Control may not be effective for excessively backlit scenes or extremely high-contrast scenes.
- Compared with other shooting modes, the shooting area will be smaller.
- If you shoot a moving subject, the subject’s movement will leave afterimages.
- The image alignment may not function properly with repetitive patterns (lattice, stripes, etc.), flat or single-tone images, or greatly misaligned shots caused by camera shake.
REFERENCE
- When the camera is set to <
 > mode, Flash shooting is not possible. In low light, the AF-assist beam may be emitted.
-
 +
+ or
or  cannot be selected. If
  +
+ or
or  has been set,
  will be set.
- • Compared to normal shooting, recording the image to the card will take longer. During the processing of the images, "BUSY" will be displayed and you cannot take another picture until the processing is completed.
- If the shooting mode is set to <
 >, direct printing is not possible.
Shooting in (HDR Backlight Control) mode
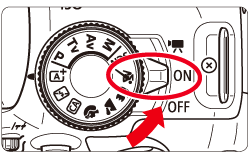
1. Set the camera's power switch to <ON>.
2. Set the Mode Dial to <SCN>.
3. Press the <

> button.
The Quick Control screen will appear.
4. Press the <

> or <

> keys to select the shooting mode icon.
5. Turn the <

> dial to select

.
REFERENCE
You can also select the shooting mode icon in step 4 by pressing <

> to display a selection of shooting modes from which you can select one.
6. Take the picture.
- Pressing the shutter button completely will take three shots, and the HDR image will be saved to the card.
IMPORTANT
While shooting, hold the camera firmly and steadily. In this mode, three shots are aligned and merged into a single image. However, if there is significant misalignment in any of the three shots due to camera shake, they may not align properly in the final image.
REFERENCE
- In Live View mode, the mirror movement is large and four shutter noises will be heard. This is not a malfunction.
 > (HDR Backlight Control) mode. When you take one picture in this mode, three continuous shots are taken at different exposures. This results in one image, with a wide tonal range, that has minimized the blocked-up shadows caused by backlighting.
 >: (HDR Backlight Control) mode. /
  : JPEG Large, Fine /
  : RAW / <
 ><
>< >: Cross keys / <
 >: Setting button <
 >: Main Dial / <
 >: Quick Control button
 > mode. HDR cannot be used in other modes.
  > mode, Flash shooting is not possible. In low light, the AF-assist beam may be emitted.
 +
+ or
or  cannot be selected. If
  +
+ or
or  has been set,
  will be set.
 >, direct printing is not possible.

 > button.
 > or <
 > keys to select the shooting mode icon.
 > dial to select
  .
.
 > to display a selection of shooting modes from which you can select one.