Solution
There are two ways to blur the background when shooting a photo.
NOTE
<

>: Creative Auto mode / <

>: Main Dial / <

>: Portrait mode / <

>: Quick Control button / <

>: Cross key / <

>: Auto flash / <

>: Flash Off
* The icons and markings indicating the camera’s buttons, dials, and settings correspond to the icons and markings on the camera and on the LCD monitor.
REFERENCE
1. The further the distance between the subject and background, the better.
The further the distance between the subject and background, the more blurred the background will look. The subject will also stand out better against an uncluttered dark background.
When using a zoom lens, set the lens on the telephoto side and get close to the subject.
3. Focus the face (when shooting portraits).
Check that the AF point covering the face flashes.
I. Using Creative Auto mode.
In the <

> mode, you can set the Background blur, Extra Effect Shot, Ambience-based shots, Drive/self-timer mode, and Flash firing functions before shooting. When you use <

> mode, you can take a picture with the subject's background blurred.
*CA stands for Creative Auto.
IMPORTANT
- Depending on the lens and shooting conditions, the background may not look so blurred.
- This function cannot be set if you use flash. If <
 > has been set and you set Background blur, <
 > will be set automatically.
- You cannot set both Extra Effect Shot and Background blur at the same time.
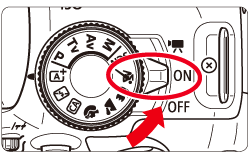
1. Turn the camera's power switch to <ON>.
2. Set the Mode Dial to <

>.
3. Press the <

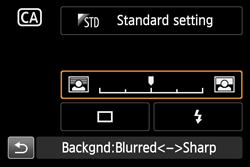
> button to display the Quick Control screen.
4. Press the <

> keys to select [backgnd: Blurred <-> Sharp], then press <

>.
REFERENCE
- If [OFF] is set, the degree of background blur will change depending on the brightness.
- If it is set to other than [OFF], you can adjust the background blur regardless of brightness.
- If you turn the <
 > dial to move the cursor to the right, the background will look sharper.
- Turning the <
 > dial to move the cursor to the left will blur the subject’s background. Note that depending on the lens’ maximum aperture (f/number), certain slider adjustments may not be selectable (indicated by・).
- If you use Live View shooting, you can see how the image is blurred in front of and behind the point of focus. While you turn the <
 > dial, [Simulating blur] will be displayed on the LCD monitor.
- If [Simulating blur] is effective during Live View shooting, the image shown while <
 > is blinking may have more noise than the actual image being recorded or it may look dark.
5. Press the <Shutter button> completely to take the picture.
The <

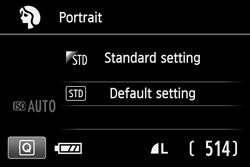
> (Portrait) mode blurs the background to make the human subject stand out. It also makes skin tones and hair look softer.
1. Turn the camera's power switch to <ON>.
2. Set the Mode Dial to <

>.
3. Press the <Shutter button> completely to take the picture.
 >: Creative Auto mode / <
 >: Main Dial / <
 >: Portrait mode / <
 >: Quick Control button / <
 >: Cross key / <
 >: Auto flash / <
 >: Flash Off
 > mode, you can set the Background blur, Extra Effect Shot, Ambience-based shots, Drive/self-timer mode, and Flash firing functions before shooting. When you use <
 > mode, you can take a picture with the subject's background blurred.
 > has been set and you set Background blur, <
 > will be set automatically.
 >.
>.

 > button to display the Quick Control screen.
 > keys to select [backgnd: Blurred <-> Sharp], then press <
 >.
>.

 > dial to move the cursor to the right, the background will look sharper.
  > dial to move the cursor to the left will blur the subject’s background. Note that depending on the lens’ maximum aperture (f/number), certain slider adjustments may not be selectable (indicated by・).
 > dial, [Simulating blur] will be displayed on the LCD monitor.
 > is blinking may have more noise than the actual image being recorded or it may look dark.
  > (Portrait) mode blurs the background to make the human subject stand out. It also makes skin tones and hair look softer.
 >.
>.
