Solution
You cannot trim or correct the tilt of images that are saved in the camera.
You can use the trimming settings in the print setting screen to modify the image before printing. For example, you can enlarge part of the image and change its composition.
REFERENCE
Set the trimming right before printing. If you set the trimming and then set the print settings, you may have to set the trimming again before printing.
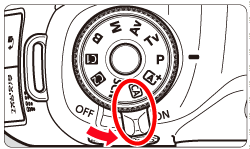
1. Set the power swith to <OFF>.
2. Set up the printer.
For details, refer to the printer’s instruction manual.
3. Connect the camera to the printer.
- Use the interface cable provided with the camera.
- Connect the cable to the camera’s <DIGITAL> terminal with the cable plug’s <
 > icon facing the front of the camera.
- To connect to the printer, refer to the printer’s instruction manual.
5. Set the power swith to <ON>.
Some printers may make a beeping sound.
6. Play back the image.
- Press the <
 > button.
The image will appear, and the [

] icon will appear on the upper left to indicate that the camera is connected to a printer.
7. Turn the <Quick Control Dial> to select the image to be printed.
8. Press <SET>. The print setting screen will appear.
9. On the print settings screen, select [Cropping], then press <SET>.
10. Set the trimming frame size, position, and aspect ratio.
NOTE
The image area within the trimming frame will be printed. The trimming frame’s aspect ratio can be changed with [Paper settings].

. Changing the trimming frame size
Turn the <Main Dial> to change the trimming frame size. The smaller the trimming frame, the larger the image magnification will be for printing.

. Moving the trimming frame
Use <Multi-controller> to move the frame over the image vertically or horizontally. Move the trimming frame until it covers the desired image area.

. Rotating the frame
Pressing the <INFO.> button will toggle the trimming frame between the vertical and horizontal orientations. This enables you to create a vertically oriented print from a horizontal image.

. Image tilt correction
By turning the <Quick Control Dial>, you can adjust the image tilt angle up to ±10 degrees in 0.5-degree increments.
When you adjust the image tilt, the [

] icon on the screen will turn blue.
11. Press <SET> to exit the trimming.
The print settings screen will reappear.
- You can check the trimmed image area on the upper left of the print settings screen.

 > icon facing the front of the camera.


 > button.
 ] icon will appear on the upper left to indicate that the camera is connected to a printer.


 . Changing the trimming frame size
 . Moving the trimming frame
 . Rotating the frame
 . Image tilt correction
 ] icon on the screen will turn blue.
