Issue
Cause and Solution
IMPORTANT
Operational requirements and restrictions are indicated at the end of this page. Be sure to read these items carefully in order to operate the printer correctly, and to avoid damage to the printer.
When a Message Appears:
Toner cartridges are consumable products. If the toner is running out during printing, a message appears in the display.
| Message | When it is Displayed | Contents and Remedies |

(X indicates K, Y, M, or C) | When a toner cartridge needs to be replaced soon | - You can continue to print.
- Have ready a new toner cartridge of the indicated color.
- It is recommended that you replace the toner cartridge before printing a large amount of data.
|
|
|

(X indicates K, Y, M, or C) | When a toner cartridge needs to be replaced soon | - The printer stops printing.
- Pressing the  (Online) key continues the job. (Online) key continues the job.
- Have ready a new toner cartridge of the indicated color.
- It is recommended that you replace the toner cartridge before printing a large amount of data. |
|
|
|
|

(X indicates K, Y, M, or C) | When there is a possibility that the toner cartridge has reached the end of its life | - You can continue to print.
- You can continue printing for a while, however, as this may result in damage to the printer, it is recommended to replace the toner cartridge with a new one.
|
|
|

(X indicates K, Y, M, or C) | When a toner cartridge has reached the end of its life | - When <1G CHG.K TNR> appears, the printer stops printing, and you cannot continue the job.
- When <1G CHG.X TNR> (X = Y, M, C) appears, you can print only in black and white.
- Replace the toner cartridge of the indicated color with a new one.
|
|
|
* Whether <16 PREP."color" TNR> or <16 CHG."color" TNR> appears when lifetime of a toner cartridge has reached depends on the setting for WARNING STEP in the SETUP menu. The printer is set to display <16 PREP."color" TNR> in the default settings.
* "K", "Y", "C", and "M" in a message indicate Black, Yellow, Cyan, and Magenta respectively.
How to replace a toner cartridge:
If any of the following messages appears, replace the toner cartridge of the indicated color with a new one.
- <1G CHG.K TNR>...Replace the black toner cartridge.
- <1G CHG.Y TNR>...Replace the yellow toner cartridge.
- <1G CHG.M TNR>...Replace the magenta toner cartridge.
- <1G CHG.C TNR>...Replace the cyan toner cartridge.
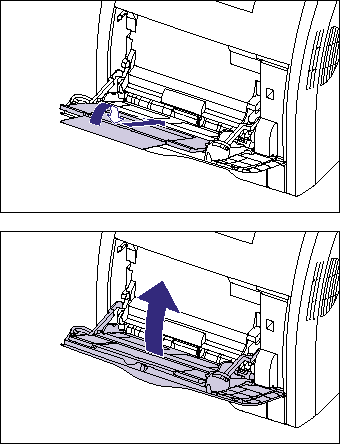
1. If you are using the multi-purpose tray, close it.
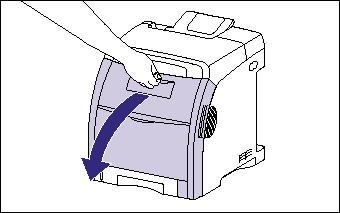
2. Open the front cover.
Holding the opening of the front cover, open it gently.
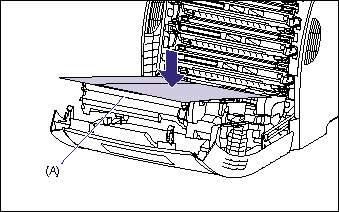
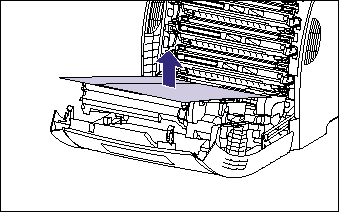
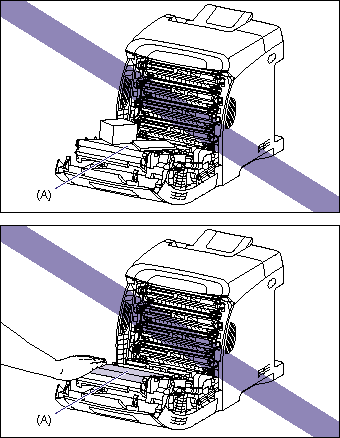
3. Place paper (A4 size paper is recommended) on the transfer belt of the ETB unit (A) as shown in the figure so that the paper is not shifted.
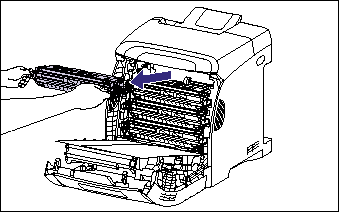
4. Holding the toner cartridge to be replaced by the blue tabs on the both sides, pull it horizontally.
Holding the toner cartridge with your both hands firmly, pull it out so that you do not touch the transfer belt of the ETB unit.
5. Take the new toner cartridge out of the protective bag after taking it out of the package.
There is a cut near the arrow on the protective bag, so you can open it by hand. However, if you cannot open it by hand, use scissors to open the protective bag so as not to damage the toner cartridge.
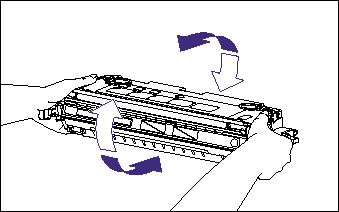
6. Hold the toner cartridge as shown in the figure, shake it gently 5 or 6 times to evenly distribute the toner inside the cartridge.
IMPORTANT
a. If toner is not distributed evenly, this may result in deterioration in print quality. Be sure to carry out this procedure properly.
b. Be sure to shake the toner cartridge gently. If you do not shake the cartridge gently, toner may spill out.
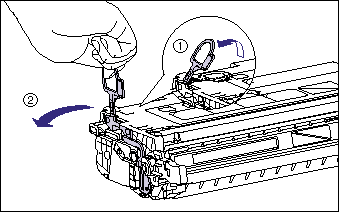
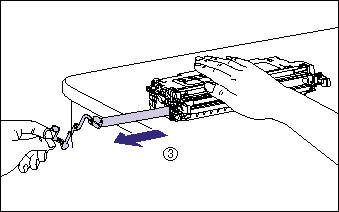
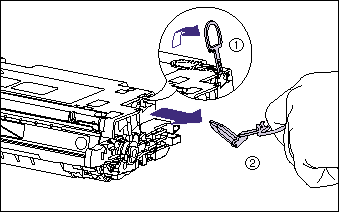
7. Place the toner cartridge on a flat surface, fold back the tab of the sealing tape (1) (2) , and then pull out the sealing tape (approx. 48 cm long) gently (3) while supporting the toner cartridge.
Remove the sealing tape by hooking your fingers into the tab and pulling it out straight in the direction of the arrow.
IMPORTANT
Do not pull the sealing tape diagonally, upwards, or downwards. If the tape is severed, it may become difficult to pull out completely.
8. Hook your finger into the tab and remove the packing materials as shown in the figure.
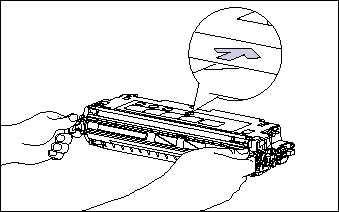
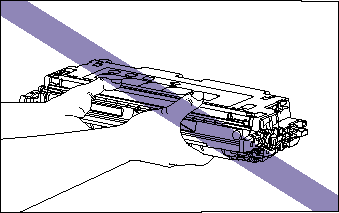
9. Hold the toner cartridge properly with the arrowed side facing up as shown in the figure.
IMPORTANT
Do not hold the toner cartridge in a manner that is not directed in this procedure.
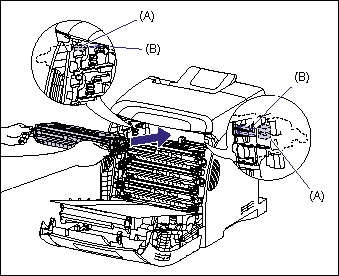
10. Hold the toner cartridge with both hands and install it into the printer.
Align (A) of the toner cartridge that you want to replace with the slots (B) to which the label of the same color is attached, then insert the cartridge until it stops.
11. Remove the paper.
12. Close the front cover.
Holding the opening of the front cover, close it gently.

IMPORTANT
a. If the printing appears faint or inconsistent even when a message does not appear, this may be due to any toner cartridge reaching the end of its life. Do not continue to use the toner cartridge and replace it with new one when there is deterioration in print quality.
b. Dispose of the packing materials according to local regulations.
c. Be sure to use only the toner cartridges designed for this printer.
d. The toner cartridges are installed in order of black, yellow, cyan, and magenta from the top as shown in the figure.
e. When installing or removing the toner cartridges, be sure to place paper on the transfer belt of the ETB unit to protect the belt.
f. Do not place any object on or touch the transfer belt (A) of the ETB unit. The transfer belt of the ETB unit is supplied with a function that cleans itself, therefore, do not clean the belt even when the toner is on it. If the ETB unit is broken or transfer belt is damaged, this may result in misfeeds or deterioration in print quality.
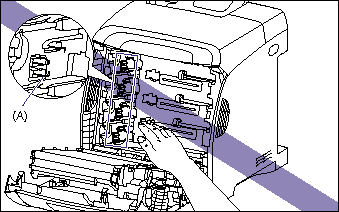
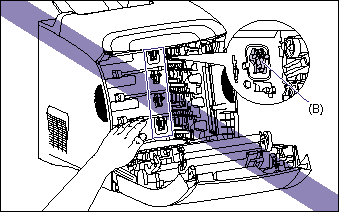
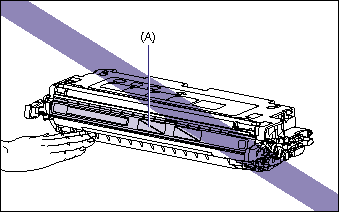
g. Do not touch the high-voltage contact (A) or the electrical contacts (B) shown in the figure, as this may result in damage to the printer.
h. Keep the protective bag for the toner cartridge. It may be required after taking out the toner cartridge for printer maintenance.
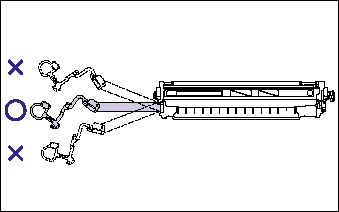
i. Pull out the sealing tape completely from the toner cartridge. If any tape remains in the toner cartridge, this may result in poor print quality.
j. When pulling out the sealing tape, be careful not to hold the drum protective shutter (A) with your hands.
k. Be sure to install the toner cartridge by pushing it firmly. If the toner cartridges are not installed firmly, this may result in deterioration in print quality.
l. When removing the paper, be careful not to touch or damage the transfer belt of the ETB unit.
m. If you cannot close the front cover, check if the toner cartridge is installed properly.
If you try to close the front cover forcefully, this may result in damage to the printer.
n. Do not leave the front cover open for a long time after installing the toner cartridge.
NOTE
a. The lifetime of the toner cartridges (Canon Genuine Cartridges) used in this printer are as follows. The numbers of the pages are estimated when printing in the following conditions.
Printing ratio: 5 %; Print density: the default; Paper size: A4 or Letter; Paper type: plain paper
- Black: Approx. 6,000 pages
- Yellow: Approx. 6,000 pages
- Magenta: Approx. 6,000 pages
- Cyan: Approx. 6,000 pages
b. Depending on the printing preferences or printing environment such as the intermittency of printing, paper types and paper sizes, the number of pages you can print may be half this number.
c. When the toner consumption is low due to low printing ratio, printing of the expected number of print pages may not be able to be achieved. Also, if you print in color, more than one cartridges may reach the end of their life at the same time.
d. Even if you print in black and white, this may affect the life of the cartridges of magenta, yellow, and cyan due to the printer structure.
e. For details on how to handle a toner cartridge, see "Precautions for handling toner cartridges" in Related Information at the end of this page.
f. The packing materials may be changed in form or position to be placed, or may be added or removed without notice.


 (Online) key continues the job.

