Issue
This section describes the procedure for specifying the paper size or page setup when printing from an application, taking Adobe Reader 7.0 as an example.
NOTE
Clarifications of the operation and additional explanations for the procedure are indicated at the end of this page. Reading these notes is highly recommended.
Cause and Solution
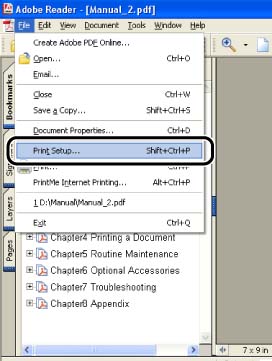
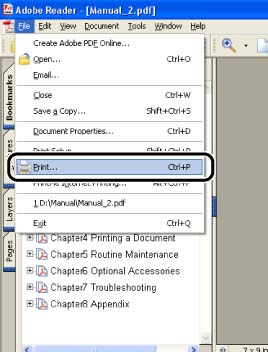
1. Open the PDF file to print with Adobe Reader, and then select [Print Setup] from the [File] menu.
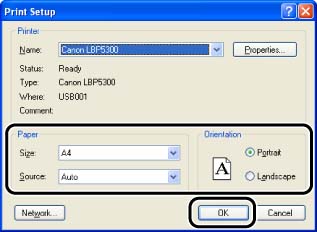
2. Specify the paper size of the document and the printing orientation, then click [OK].
3. Select [Print] from the [File] menu.
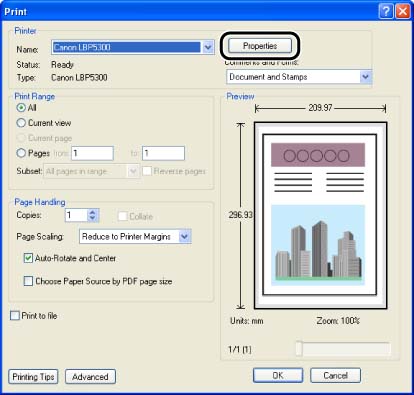
4. Select the name of this printer for [Name] or [Printer Name], and then specify the printing preferences.
NOTE
The printer name displayed in this dialog box can be changed in the [Printers and Faxes] folder (the [Printers] folder for Windows 98/Me/2000).
5. Click [Properties].
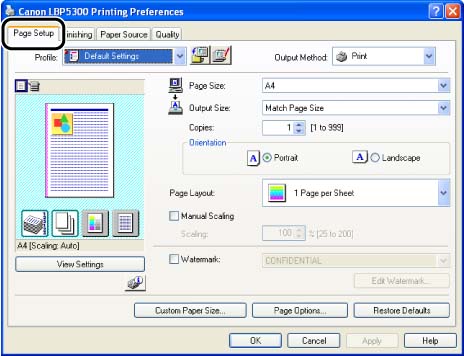
6. Display the [Page Setup] sheet and specify the paper size or page setup.
The [Page Setup] sheet allows you to specify the following printing preferences:
| Setting/Button | Contents |
| [Page Size] | You can select the paper size of the document created by an application. |
| [Output Size] | You can specify the actual paper size to be printed. |
| [Copies] | You can specify the number of copies to be printed. |
| [Orientation] | You can specify the printing orientation. |
| [Page Layout] | - [N Pages per Sheet] (N = 1, 2, 4, 6, 8, 9, 16) |
| Prints multiple pages on one sheet of paper. Some applications provide a function to print a document as a collated set of copies. Do not use this function with [N Pages per Sheet]. |
| - [Poster [N x N]] (N = 2, 3, 4) |
| Magnifies a single page image and print it out on multiple sheets of paper. You can join these printouts together to make one large poster. |
| [Page Order] | You can specify the page order layout for printing when [Page Layout] is set to [N Pages per Sheet] (N = 2, 4, 6, 8, 9, 16). |
| [Manual Scaling] | Selecting this check box allows you to enter the value for scaling the printed document manually. |
| [Watermark] | You can superimpose watermarks (such as [COPY], [DRAFT], etc.) over the documents created by an application. Select the check box for this option and select a watermark to print with the document. Select the watermark from the drop-down list on the right. |
| [Edit Watermark] | Displays a dialog box for modifying the added watermarks. |
| [Custom Paper Size] | Displays a dialog box for specifying custom paper sizes. |
| [Page Options] | Allows you to print printing date, user name, page numbers, or a border. |
[Custom Paper Size Settings] dialog box:
The following dialog box is displayed by clicking [Custom Paper Size].
This dialog box allows you to specify the height and width of custom paper size, which is different from the standard paper sizes.
On Windows 98/Me, up to 30 custom paper sizes can be added. On Windows 2000/XP/Server 2003, the number depends on the system environment.
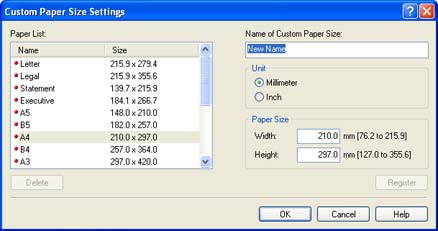
| Setting/Button | Contents |
| [Paper List] | Displays [Name] and [Size] of standard paper sizes and added custom paper sizes. The paper sizes with a small red mark placed at the left side of the name are standard paper sizes and [Custom [Name Fixed]]. These standard paper sizes and [Custom [Name Fixed]] cannot be deleted. |
| [Name of Custom Paper Size] | You can enter the name of the custom paper size to be added. |
| [Unit] | Specify the unit ([Millimeter] or [Inch]) to be used when setting the custom paper size. |
| [Paper Size] | Specify the height and width of the custom paper size ([Height] |
| [Width]). Specify the custom paper size in portrait orientation ([Height] |
| [Width]) within user-definable sizes. |
| [Delete] | Deletes the custom paper size selected in [Paper List]. However, you cannot delete the default standard paper sizes and [Custom [Name Fixed]]. |
| [Register] | Registers custom paper sizes. |
[Edit Watermark] dialog box :
The following dialog box is displayed by clicking [Edit Watermark].
This dialog box allows you to add new watermarks and edit the added watermarks.
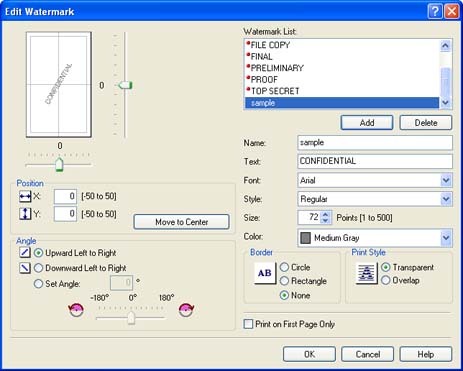
| Setting/Button | Contents |
| [Position] | You can specify the position to print the selected watermark on the document. Enter X and Y axis values between -50 and 50 (The center of the paper is defined as 0 (zero)). Alternatively, drag the sliders on the bottom and the right of Preview to specify the position. |
| [Move to Center] | Moves the watermark to the center of the document. |
| [Angle] | You can specify the angle to print the selected watermark on the document (The horizontal position is defined as 0 (zero)). |
| [Watermark List] | Displays a list of registered watermarks. The watermarks with a small red mark placed at the left side of the name are provided by default. These provided watermarks cannot be deleted. |
| [Add] | Allows you to add and specify a new watermark in the [Edit Watermark] dialog box (Up to 50 watermarks can be added). |
| [Delete] | Deletes the watermark selected in [Watermark List]. However, you cannot delete the default watermarks. |
| [Name] | You can enter the name for the added watermark to be displayed in [Watermark] in the [Page Setup] sheet. |
| [Text] | Enter the characters to be printed as a watermark. |
| [Font] | Select the font to be used for the watermark (True Type fonts only). |
| [Style] | Select the font style for the watermark. |
| [Size] | Specify the font size for the watermark. |
| [Color] | Specify the color for the watermark. |
| [Border] | Specify whether a border encloses the watermark when printed. |
| [Print Style] | Select the watermark type from [Transparent] or [Overlap]. |
| [Print on First Page Only] | Select this check box when printing the watermark only on the first page of the document. |
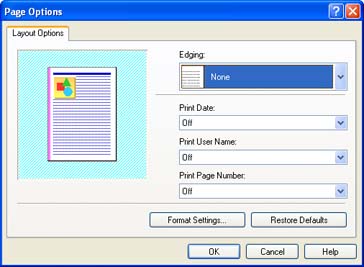
[Page Options] dialog box:
The following dialog box is displayed by clicking [Page Options].
This dialog box allows you to specify borders, date, and page numbers, etc. to be printed on the printouts.
| Setting/Button | Contents |
| [Edging] | You can select the type of edging to print as a border. When a border is applied, the original print data will be reduced slightly in size to make room for the border. |
| [Print Date] | You can print the date. |
| [Print User Name] | You can print a user name that is registered in the computer. |
| [Print Page Number] | You can print page numbers. |
| [Format Settings] | Displays a dialog box for specifying the font for printing date and page number. |
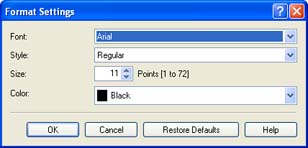
[Format Settings] dialog box:
The following dialog box is displayed by clicking [Format Settings] in the [Page Options] dialog box.
This dialog box allows you to specify the font for printing date and page number.
| Setting/Button | Contents |
| [Font] | Select the font to be used (True Type fonts only). |
| [Style] | Select the font style to be used. |
| [Size] | Specify the font size to be used. |
| [Color] | Select the color to be used. |
NOTE
The settings that are specified here only apply to the currently opened file. Check the contents of the [Document Properties] dialog box each time you print.
7. Confirm the settings, then click [OK].
The [Print] dialog box reappears.
Click [OK] in the [Print] dialog box. Then, the printer starts printing.
NOTE
a. The screen shots used in this section are from Windows XP Professional.
b. The procedure for displaying the [Document Properties] dialog box may differ depending on the application you are using.
c. The default settings for all files can be specified using the following dialog boxes.
- For Windows 2000/XP/Server 2003: Open the [Document Properties] dialog box from the [Printers and Faxes] folder or the [Printers] folder.
- For Windows 98/Me: Open the [Printer Properties] dialog box from the [Printers] folder.
d. For more details on using these sheets, see Online Help.
You can access Online Help using the following procedure. To close any Online Help that is currently displayed, click somewhere inside the Online Help window.
- Press the [Tab] key on your keyboard to select the item of which you want to display Help, then press the [F1] key.
- Right-click the item of which you want to display Help, then click [What's This?] from the pop-up menu.
- Click [

] (Help) in [Titlebar], then move the [?]-attached cursor to the item that you want to display, and then click it.
e. "User's Guide" (PDF manual) in the CD-ROM supplied with the printer describes how to use the various functions of the printer and printer driver. By specifying the settings for the printer and printer driver for each job, you can make the best use of the printer and its functions.



 ] (Help) in [Titlebar], then move the [?]-attached cursor to the item that you want to display, and then click it.