Solution
This camera comes equipped with a function for creating short movie clips called "video snapshots."
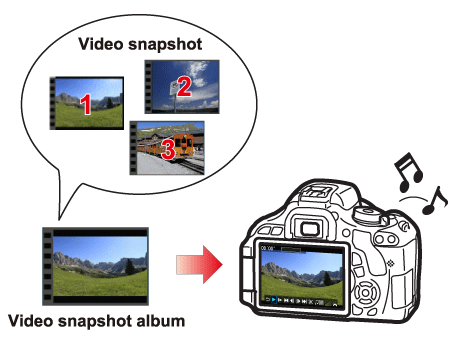
A video snapshot is a short movie shot in one take that lasts for a few seconds. If you set the length of one scene (approximately 2, 4, or 8 seconds) and start shooting movies, the shooting will end after the set amount of time passes. If you shoot a number of video snapshots in this way, you can record them as a "video snapshot album," a single movie file recorded on the memory card.
A video snapshot album can also be played together with background music.
In this section, the operations involved in shooting video snapshots are explained in the steps below.
(1) Setting the Video Snapshot Shooting Duration
(2) Creating a Video Snapshot Album
(3) Playing an Album
(4) Playing together with Background Music (if adding other music to the video snapshot)
Setting the Video Snapshot Shooting Duration
1. Set the power switch to <ON>.
2. Set the mode dial to <

>(Movie).
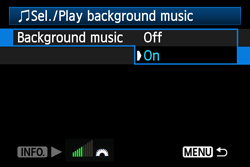
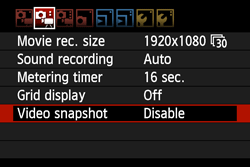
3. Press the <MENU> button to bring up the menu display, then select [Video snapshot] under the [

] tab. Press the <SET> button.
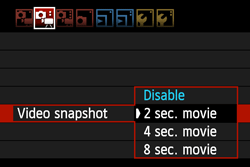
4. Select the [Video snapshot] shooting duration.
- Press the <Cross Keys> to select the video snapshot shooting duration, then press the <SET> button.
- You can select approx. 2 sec., 4 sec., or 8 sec.
- Press the <MENU> button to exit the menu and return to movie shooting.
Creating a Video Snapshot Album
5. Press the <

> button to shoot the first video snapshot.
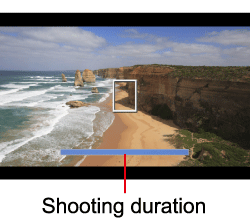
- The blue bars indicating the shooting duration will gradually decrease. After the set shooting duration elapses, the shooting stops automatically.
- After the LCD monitor turns off and the access lamp stops blinking, the confirmation screen will appear.
6. Press the <Cross Keys> to select [

Save as album], then press the <SET> button.
The movie clip will be saved as the video snapshot album’s first video snapshot.
7. Repeat step 5 to shoot the next video snapshot.
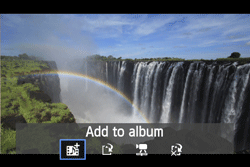
- Press the <Cross Keys> to select [Add to album], then press the <SET> button.
- To create another video snapshot album, select [
 Save as a new album].
Items that can be selected on this screen
| Option | Description |
 Add to album Add to album | The video snapshot just recorded will be added to the album recorded immediately before. |
 Save as a new album Save as a new album | A new video snapshot album is created and the movie clip is saved as the first video snapshot. The new album will be a different file from the previously recorded album. |
 Playback video snapshot Playback video snapshot | The video snapshot just recorded will be played. For the details on playback operations, see the "[Playback video snapshot] Operations" table below. |
 Delete without saving to album Delete without saving to album | If you want to delete the video snapshot you just recorded and not save it to the album, select [OK]. |
[Playback video snapshot] Operations
| Icon | Item | Playback Description |
 |
Exit | Returns to the previous screen. |
 |
Play |
By pressing the <SET> button, you can play or pause the justrecorded video snapshot. |
 |
First frame |
Displays the first scene of the album’s first video snapshot. |
 |
Skip backward* |
Each time you press the <SET> button, the video snapshot skips back by a few seconds. |
 |
Previous frame | Each time you press the <SET> button, a single previous frame is displayed. If you hold down the <SET> button, it will rewind the movie. |
 | Next frame |
Each time you press the <SET> button, the movie will play frame-byframe. If you hold down the <SET> button, it will fast forward the movie. |
 | Skip forward* |
Each time you press the <SET> button, the video snapshot skips forward by a few seconds. |
 |
Last frame | Displays the last scene of the album’s last video snapshot. |
 |
Playback position |
| mm' SS" |
Playback time (minutes:seconds) |
 |
Volume |
You can adjust the built-in speaker’s sound volume by turning the <Mai Dial>. |
*With [Skip backward/Skip forward], the skipping duration will correspond to the number of seconds set under [Video snapshot] (approx. 2 sec., 4 sec., or 8 sec.).
8. Set [Video snapshot] to [Disable]. Press the <MENU> button to exit the menu and return to normal movie shooting.
IMPORTANT
To return to normal movie shooting, be sure to set [Video snapshot] to [Disable].
NOTE
- You can add to an album only video snapshots having the same duration (approx. 2 sec., 4 sec., or 8 sec. each). If you stop shooting a video snapshot before the set shooting duration elapses, the video snapshot will be added to the preceding album. And a new album will be created for subsequent video snapshots.
- You cannot change the order of the video snapshots in an album or add more video snapshots to the album later.
- You cannot take still photos while shooting a video snapshot.
- The shooting duration of a video snapshot is only approximate. Depending on the frame rate, the shooting duration displayed during playback might not be exact.
You can play back video snapshot albums that you have created by following the procedures below.
9. Press the <

> button. Press the <Cross Keys> to select an album, then press the <SET> button.
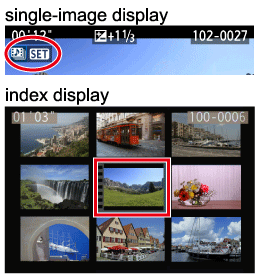
- During the single-image display, the [
 ] icon displayed on the upper left of the screen indicates that it is a video snapshot album.
- During the index display, the perforation on the left edge of the image indicates that it is a video snapshot album. Video snapshot albums cannot be played on the index display, so press the <SET> button to switch to the single-image display.
10. On the single-image display, press the <SET> button.
The movie playback panel will appear on the bottom.
11. Press the <Cross Keys> to select [

], and then press the <SET> button to start playing the movie.
- You can pause the movie playback by pressing the <SET> button.
- For further information for the movie playback panel, please refer to the instruction manuals that came with your camera.
Playing together with Background Music (if adding other music to the video snapshot)
To add background music to your video snapshots, follow the steps below.
These steps are not necessary when using the music recorded at the same time that the video snapshots were shot.
IMPORTANT
- Upon purchase, the camera is not set for selecting the background music. You must first use EOS Utility (provided software) to copy the background music to the card. For details, see the EOS Utility Instruction Manual in the CD-ROM.
- Music recorded on the memory card must be used only for private enjoyment. Do not violate the rights of the copyright holder.
12. When you have reached Step 10 above, press the <Cross Keys> to select the background music item, and then press the <SET> button.
13. Set [Background music] to [On], then press the <SET> button.
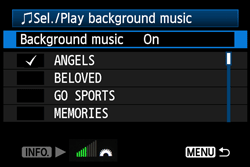
14. Press the <Cross Keys> to select the desired background music then press the <SET> button.
- You can also select multiple background musics.
- To hear a sample of a background music, press the <INFO.> button. Press the <Cross Keys> to listen to another background music. To stop listening to the background music, press the <INFO.> button again.
- Adjust the sound volume by turning the <Main Dial>.
15. After selecting the setting, press the <MENU> button.
 >(Movie).
 ] tab. Press the <SET> button.
 > button to shoot the first video snapshot.
 Save as album], then press the <SET> button.
 Save as album
 Playback video snapshot
 Do not save to album
 Save as a new album].
 Add to album
 Save as a new album
 Playback video snapshot
 Delete without saving to album


 > button. Press the <Cross Keys> to select an album, then press the <SET> button.
 ] icon displayed on the upper left of the screen indicates that it is a video snapshot album.
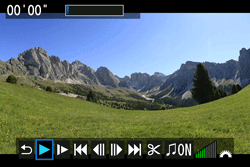
 ], and then press the <SET> button to start playing the movie.

