Setting the date and time
Solution
This section explains how to set the date and time of the camcorder.
You will need to set the date and time of the camcorder before you can start using it. The [Date/Time] screen will appear automatically when the camcorder’s clock is not set. When the [Date/Time] screen appears, the year will be selected.
1. Turn on the camcorder.
2. Setting the Date and Time.
2-1. Change <  > the year and move <
  > to the month. Change the rest of the fields (month, day, hour and minutes) in the same way.
> the year and move < > to the month. Change the rest of the fields (month, day, hour and minutes) in the same way.
2-2. Select < > [OK] and press <SET> to start the clock and close the setup screen.
> [OK] and press <SET> to start the clock and close the setup screen.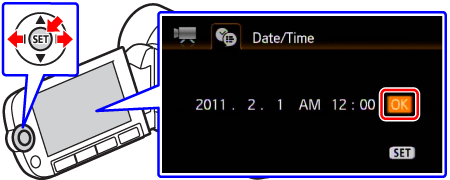
1. Turn on the camcorder.
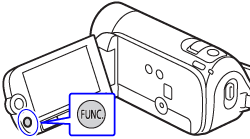
2. Press the < FUNC. > button.
3. Select the [  Menu ] icon and press < SET > to open the setup menus.
Menu ] icon and press < SET > to open the setup menus.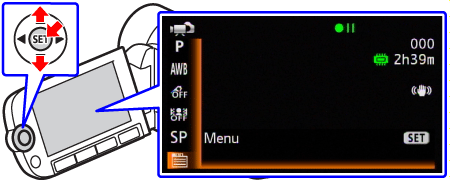
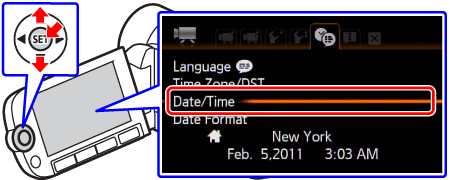
4. Select the [  (Language and Date/Time Setup) ]
(Language and Date/Time Setup) ]
5. Select the [Date/Time] and press < SET >.
6. Setting the Date and Time.
6-1. Change < > the year and move < > to the month. Change the rest of the fields (month, day, hour and minutes) in the same way.
> the year and move < > to the month. Change the rest of the fields (month, day, hour and minutes) in the same way.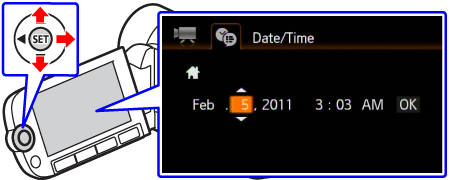
6-2. Select < > [OK] and press <SET> to start the clock and close the setup screen.
> [OK] and press <SET> to start the clock and close the setup screen.7. Press < FUNC. > to save the settings and close the menu.
NOTE
- When you do not use the camcorder for about 3 months, the built-in rechargeable lithium battery may discharge completely and the date and time setting may be lost. In such case, recharge the built-in lithium battery and set the time zone, date and time again.
- The date appears in a year-month-day format only in the first setup screen. In subsequent screen displays the date and time will appear as month-day-year (for example, [Jan. 1, 2011 12:00 AM]). You can change the date format and the clock format (12/24 hours) with the [ (Language and Date/Time Setup) ]
 [Date Format] setting.
Change the time zone to match your location. The default setting is New York.
1. Press the < FUNC. > button.
2. Select the [ Menu ] icon and press < SET > to open the setup menus.
Menu ] icon and press < SET > to open the setup menus.3. Select the [ (Language and Date/Time Setup) ]
(Language and Date/Time Setup) ]4. Select the [Time Zone/DST] and press < SET >.

5. Select the [  ].
].
].
REFERENCE
When you travel, select the [  ] icon and select the time zone that matches the local time at your destination.
] icon and select the time zone that matches the local time at your destination.6. Select the area name.

REFERENCE
To adjust for daylight saving time, select the area name marked with a [  ].
].
].7. Press < FUNC. > to close the menu.