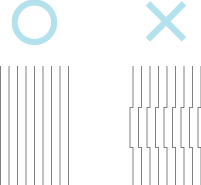
Solution
If printed vertical lines are warped or colors are out of alignment, execute Head Posi. Adj. to adjust the Printhead alignment.
Normally, execute Auto(Standard) or Auto(Advanced).
However, when printing on special paper, or if printing is not improved after Auto(Advanced), try Manual Adjustment.
Manual adjustment requires you to examine the printed test pattern and enter an adjustment value.
NOTE
- Manual Adjustment may be unavailable in some cases, even if it is displayed in the menu.
If so, execute Auto(Advanced) once.
- Always make sure the loaded paper matches the type of paper specified on the printer. Adjustment cannot be completed correctly unless the loaded paper matches the settings.
- We recommend using the type of paper you use most often for adjustment.
Paper to Prepare
An unused roll at least 10 inches wide
One sheet of unused paper of at least A4/Letter size
Perform adjustment as follows.
1.Load the paper.
2.On the Tab Selection screen of the Control Panel, press

or

to select the Settings/Adj. tab (

).
NOTE
- If the Tab Selection screen is not displayed, press the Menu button.
3.Press the OK button.
The Set./Adj. Menu is displayed.
4.Press

or

to select Adjust Printer, and then press the OK button.
5.Press

or

to select Head Posi. Adj., and then press the OK button.
6.Press

or

to select Manual, and then press the OK button.
A test pattern is printed for adjustment.
7.Press

or

to select D, and then press the OK button.
8.Press

or

to select D-1, and then press the OK button.
9.Examine adjustment test pattern D-1 and determine the number with straight lines.
NOTE
- If two patterns seem equally good and you cannot decide which one is better, choose an intermediate value.
For example, choose 11 if you cannot decide whether pattern 10 or 12 is better.
10.Press

or

to select the pattern number you have decided, and then press the OK button.
11.Repeat steps 8–10 to specify the adjustment value for D-2 to D-5 and D-7 to D-11.
12.Press the Back button.
13.Press

or

to select Register Setting, and then press the OK button.
14.Press

or

to select Yes, and then press the OK button.
The adjustment value is now registered, and adjustment is complete.

 or
or  to select the Settings/Adj. tab (
 ).
).
 or
or  to select Adjust Printer, and then press the OK button.
  or
or  to select Head Posi. Adj., and then press the OK button.
  or
or  to select Manual, and then press the OK button.
 or
or  to select D, and then press the OK button.
  or
or  to select D-1, and then press the OK button.
 or
or  to select the pattern number you have decided, and then press the OK button.
  or
or  to select Register Setting, and then press the OK button.
  or
or  to select Yes, and then press the OK button.