Solution
This section describes how to insert the memory card into a printer and print images recorded in the memory card.
CAUTION
- To select items that are displayed on the printer's [LCD monitor], press the bottom at the
 to the left, right, top, or bottom. To specify the selected items,
  press the <OK> button.
- When printing from the memory card, please make sure that no cameras or PCs are connected.
- For memory cards requiring an adapter, be sure to first insert the memory card into the adapter before inserting the adapter into the appropriate card slot. If you insert the memory card into a card slot without using an adapter, you may not be able to remove the memory card from SELPHY.
- Refer to the user guide included with your memory card and adapter for handling instructions.
- Use a memory card formatted in the device used for taking the images. A memory card formatted in the computer may not be recognized.
- Irregularly sized images, or images that have been edited on a computer may not display or print properly.
- When printing images that were shot with mobile phones, there are cases where the images are not displayed or printed correctly depending on the image size that was set during shooting.
- This SELPHY printer supports image data conforming to the Design rule for Camera File system (Exif compliant) standard.
1. Turn on the printer and insert the memory card.

Turn on the printer.

Insert the memory card.
Insert the memory card into the appropriate slot. There are lead-in guides to match the size of the memory cards in [SD / miniSD / MMC+] slot. Please insert small memory cards (miniSD cards) into the lower slot, following the guide. Insert only one memory card.
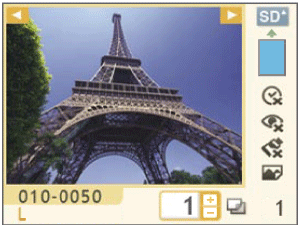
2. The following screen appears on the printer's [LCD monitor] (Display when [Info Display] is set to [On]).
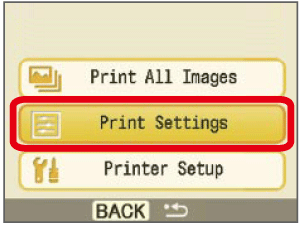
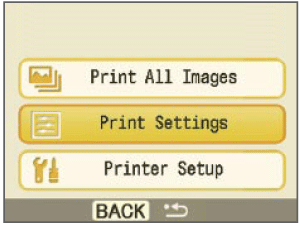
3. When pressing the <MENU> (

) button , the following screen appears, so select [Print Settings].
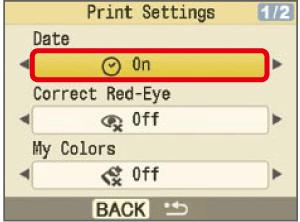
4. The following screen appears. You can set [Date] or [Borders] in this screen. Press the <BACK> (

) button after making settings.
5. The following screen appears, so press the <BACK> (

) button to return to the image-selection screen.
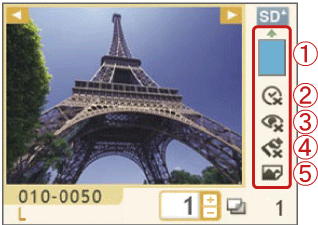
6. The following screen appears.
When you select [Date] and [Borders], make sure that these settings are shown with icons on the LCD monitor's right hand side.

[Borders, Page Layout]

[Date]

[Correct Red-Eye]

[My Colors]

[Image Optimize]
The [Bordered], [Borderless], or [Page Layout] setting is indicated by the

icon as follows.
(

) [Borderless]
(

) [Bordered]
(

) [4-up]
If (

) is shown below an icon, the setting is [Off], and if an icon is grayed out, the setting is not available.
e.g., [Date]
(

) [Date] [On]
(

) [Date] [Off]
(

) [Date] Cannot be set.*
*Depending on the layout, imprinting the date may not be possible.
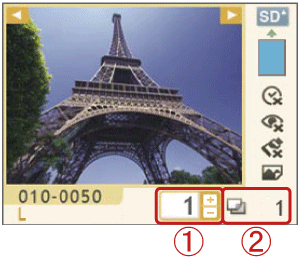
7. Specify the number of copies for printing.

Number of copies of the displayed image (Select the image you want to print, and then press the <COPIES> (

) buttons to specify the number of copies to make).

Total number of prints (Number of sheets required).
Press the <PRINT> (

) button, and printing will start.
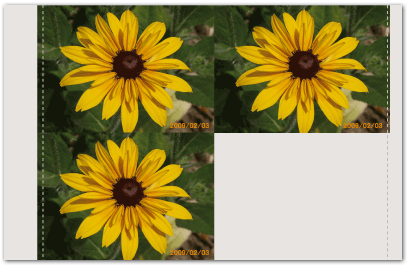
8. The finished image will look like the one shown below (It will differ depending on the type of paper and the size of the ID photos).
In the following example, the [4-up] layout is set for an [L size] sheet, and 3 is selected for the number of prints (the procedure of which is indicated in

of Step 7).
NOTE
- The date used in the date imprint is the shooting date in the Exif data included with each image data. If the image data does not contain Exif information, the file modification date is used as the date imprint.
- The date, the font to indicate the time, colors, and displayed positions cannot be changed.
 to the left, right, top, or bottom. To specify the selected items,
  press the <OK> button.

 Turn on the printer.
 Insert the memory card.
 ) button , the following screen appears, so select [Print Settings].
 ) button after making settings.
 ) button to return to the image-selection screen.
 [Borders, Page Layout]
 [Date]
 [Correct Red-Eye]
 [My Colors]
 [Image Optimize]
 icon as follows.
  ) [Borderless]
 ) [Bordered]
 ) [4-up]
 ) is shown below an icon, the setting is [Off], and if an icon is grayed out, the setting is not available.
 ) [Date] [On]
  ) [Date] [Off]
  ) [Date] Cannot be set.*
 Number of copies of the displayed image (Select the image you want to print, and then press the <COPIES> (
 ) buttons to specify the number of copies to make).
 Total number of prints (Number of sheets required).
 ) button, and printing will start.
 of Step 7).