
Scanning Documents to a Computer Connected with USB Cable
Solution
This section describes the basic procedure for scanning documents to your computer directly connected with a USB cable. Make sure that the scanner driver is installed.
You can scan documents and transmit the scanned data to your computer using the operation panel of the machine.
NOTE
- Make sure that the machine is connected to your computer with a USB cable and the USB scanner driver has been installed.
- The MF4350d/MF4340d/MF4330d/MF4320d does not support network scanning.
1. Place documents.
2. Press  [SCAN] repeatedly to select <USB SCANNING>.
[SCAN] repeatedly to select <USB SCANNING>.For MF4350d/MF4340d/MF4330d/MF4320d, just press [SCAN] to display <SCANNING MODE>.
[SCAN] to display <SCANNING MODE>.3. Press  [Start].
[Start].- If you are asked to select a program to launch, select "MF Toolbox Ver4.9." The scanned document will be processed according to your settings.
- When scanning is complete, a folder with the scanning date will be created in the [My Pictures] folder in the [My Documents] folder, and your document will be saved in this folder. (In Windows Vista, the folder will be created in the [Pictures] folder.)
You can scan a document using the buttons on the MF Toolbox.
1. Place documents.
2. On the Windows desktop, double-click the [Canon MF Toolbox 4.9] icon to open the MF Toolbox.
You can also open the MF Toolbox by clicking [start] on the Windows task bar -> [(All) Programs] -> [Canon] -> [MF Toolbox 4.9] -> [Toolbox 4.9].
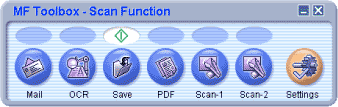
3. Click one of the scanning buttons.
- [Mail]: The document will be scanned and attached to an e-mail message in your e-mail application.
- [OCR]: The text will be scanned and read by the OCR software.
- [Save]: The document will be scanned and saved.
- [PDF]: The text will be scanned and saved as a PDF file.
- [Scan-1], [Scan-2]: The text will be scanned and appear in the registered application.
You can change the button name by directly entering a new name (up to 8 characters long) over the button name.
A dialog box appears for each of the buttons.
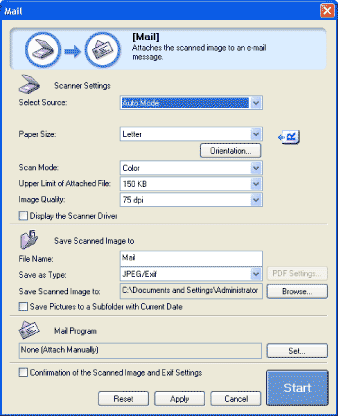
Example: [Mail] dialog box
4. Specify the required settings.
If you want to keep the same settings for future scans, click [Apply] before clicking [Start].
NOTE
With [Scan-1] and [Scan-2] buttons, you can set the different settings for each. If you save the settings by clicking [Apply], the settings will be effective next time.
5. Click [Start].
If you select [Display the Scanner Driver] in step 4, the [ScanGear MF] dialog box will appear.

6. Specify the required settings.
7. Click [Scan].
- When scanning is complete, a folder with the scanning date will be created in the [My Pictures] folder in the [My Documents] folder, and your document will be saved in this folder. (In Windows Vista, the folder will be created in the [Pictures] folder.)
- If you have applications registered to the [Mail], [OCR], [PDF], [Scan-1], or [Scan-2] buttons, the scanned image will be displayed in the application or attached to an email message after scanning.
- For some models, the CD-ROM provided with the machine contains the following applications which can be used with the MF Toolbox. They will be registered in the MF Toolbox buttons at the time of installation.
- [OCR]: ScanSoft OmniPage SE
- [PDF]: Presto! PageManager
NOTE
ScanSoft OmniPage and Presto! PageManager are not supported on Windows XP 64-bit version.
You can scan an image from a TWAIN- or WIA- (Windows XP/Vista Only) compliant application and use the image in that application. The following is an example of the procedure.
1. Place documents.
2. Open the application you want to use.
3. Select the command to scan.
4. Select the scanner driver to be used.
With Windows XP/Vista, you can use the ScanGear MF or the WIA driver as the scanner driver.
5. Specify the scanner settings -> click [Scan].