Paper Feeding and Paper Output
Solution
This section describes paper feeding area, paper output area and their capacities.
The paper feeding area and delivery area are as follows.
CAUTION
Do not insert your fingers into the gaps around the original supply tray, as your fingers may get caught. Also, be careful not to drop objects, such as paper clips into the gaps, as doing so may cause damage to the machine or cause it to break down.
IMPORTANT
Do not place any objects in the original output area. If the original output area is blocked, originals may get damaged, and printing may not be performed correctly.
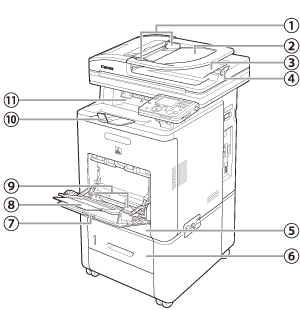
| 1 | Slide Guides | Adjust the slide guides to match the width of the originals. |
| 2 | Original Supply Tray | Originals placed here are automatically fed sheet by sheet to the scanning area of the platen glass. Place originals into this tray with the surface that you want to scan face up. |
| 3 | Original Output Tray | Originals that have been scanned from the original supply tray are output to the original output tray in the order that they are fed into the feeder. |
| 4 | Original Stopper | Prevents the originals from falling off the paper delivery tray. Open the stopper from its original position for A4/LTR size paper. For LGL size paper, pull out the extension first, and then open the stopper. |
| 5 | Paper Drawer | Holds up to 250 sheets of paper (80 g/sq.m.) |
| 6 | Optional Cassette Feeding Unit-AB1 | Holds the additional paper. Up to 500 sheets of paper (80 g/sq.m.) can be held. |
| 7 | Stack Bypass Tray | Feeds non-standard size or thick/thin type paper stacks. |
| 8 | Stack Bypass Tray Extension | Pull out to load paper stack. |
| 9 | Slide Guides for Stack Bypass Tray | Adjusts to the width of the paper. |
| 10 | Paper Stopper | Prevents the paper from falling off the paper delivery tray. Open the stopper from its original position for A4/LTR size paper. For LGL size paper, pull out the extension first, and then open the stopper. |
| 11 | Paper Delivery Tray | Copies, prints and faxes are output to the paper delivery tray. |
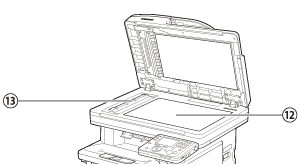
| 12 | Platen Glass | Place originals here when scanning books, thick originals, thin originals, transparencies, etc. |
| 13 | Scanning Area | Originals placed in the feeder are scanned here. |
Quantity of paper that can be loaded for each paper feeding and output areas is as follows.
| Paper Feeding Areas | Paper Output Areas | ||||||||||||
| Paper Feeding/Paper Output Areas | Paper Drawer 1 | Stack Bypass Tray | Optional Paper Drawer (Paper Drawer 2) | Paper Delivery Tray | |||||||||
| Quantity | Plain (from 70 to 90 g/sq.m.) | 250 | 100 | 500 | 250 LGL : 150 | ||||||||
| Plain H (from 75 to 105 g/sq.m.) | 200 | 80 | 400 | 100 | |||||||||
| Heavy 1 (from 106 to 120 g/sq.m.) | 200 | 80 | 400 | 100 | |||||||||
| Heavy 2 (from 121 to 176 g/sq.m.) | - | 50 | - | 40 | |||||||||
| Rough (from 60 to 90 g/sq.m.) | 200 | 80 | 400 | 150 | |||||||||
| Recycled (from 70 to 90 g/sq.m.) | 250 | 100 | 500 | 160 | |||||||||
| Transparency | - | 50 | - | 50 | |||||||||
| Labels | - | 40 | - | 40 | |||||||||
| Envelopes | - | 10 | - | 10 | |||||||||
* The quantity shown above is approximate and may vary depending on the system environment and the paper conditions.