Loading Paper
10-May-2008
8200174100
Solution
IMPORTANT
- If you cut plain paper to 4" x 6" / 101.6 x 152.4 mm, 5" x 7" / 127.0 x 177.8 mm, or 2.13" x 3.39" / 54.0 x 86.0 mm (credit card-size) for a trial print, it can cause paper jams.
- You cannot print on postcards affixed with photos or stickers.
- Always load paper in portrait orientation (A). Loading paper in landscape orientation (B)can cause the paper to be jammed.

NOTE
- For details on specialty Canon media, see [ Compatible Media Types ]
When Printing on Plain Paper
- You can use general copy paper or Canon's Super White Paper. When printing on both sides, we recommend Canon’s Super White Paper Double-Sided. Paper size:
– Standard sizes: A4, B5, A5, Letter, and Legal
– Non-standard sizes: 2.13" x 3.39" to 8.5" x 23" / 54.0 x 86.0 mm to 215.9 x 584.2 mm
Paper weight: 17 to 28 lb / 64 to 105 gsm (plain paper except for genuine Canon media)
- You can load approximately up to 100 sheets of plain paper (17 lb / 64 gsm). However, proper feeding of paper may not be possible at this maximum capacity depending on the type of paper or environmental conditions (either very high or low temperature and humidity). In such cases, reduce paper to around half.
- Do not stack more than 50 sheets in the Paper Output Tray.
When Printing on 5" x 7", 4" x 6", or 2.13" x 3.39" (Credit Card-sized) paper
- You can load up to 20 sheets of 4" x 6" or 2.13" x 3.39" (credit card-sized) paper and 10 sheets of 5" x 7" paper.
- We recommend using genuine Canon photo media when printing photographs. See [ Compatible Media Types ]
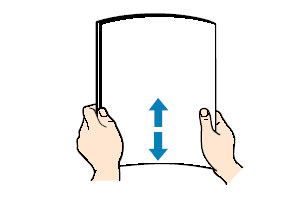
1.Align the edges of the paper before loading it.

NOTE
- Loading paper without aligning the edges may cause paper jams.
- If paper is curled, hold the opposing curled corners and gently bend them in the opposite direction until the paper becomes completely flat. See [ Paper is curled ]
- To avoid curling, handle paper as follows.
– Put unused paper back into the package and store it horizontally.
– Take out only the necessary number of sheets from the package, just before printing.
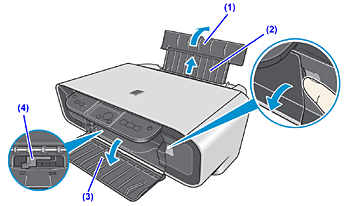
2. Prepare to load paper.

(1) Open the Paper Support.
(2) Pull out the Paper Support Extension.
(3) Open the Paper Output Tray.
(4) Adjust the position of the Paper Thickness Lever.
Set it to the right when printing on envelopes or T-shirt transfers, and left when printing on
any other type of paper. See [ Compatible Media Types ]
NOTE
If the corners or edges of the paper are smudged, try to print with the Paper Thickness Lever set to the right. It may improve print quality.
Reset the Paper Thickness Lever to the left when you finish printing.
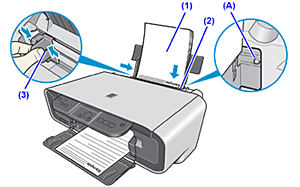
3. Load the paper.

* Do not load higher than the Load Limit Mark (A).
(1) Load the paper in the Rear Tray with the print side facing UP.
(2) Align the paper stack against the right side of the Auto Sheet Feeder.
(3) Pinch the Paper Guide and slide it against the left side of the paper stack.