Solution
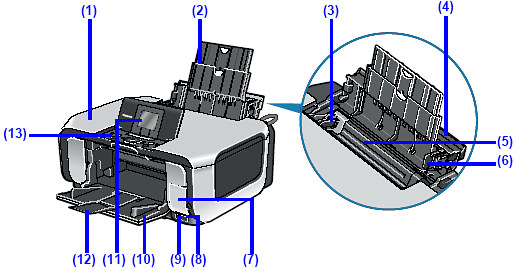
(1) Document Cover
Open when loading an original document on the Platen Glass.
(2) Paper Support
Pull out fully to support paper loaded on the tray.
(3) Paper Guide
Slide against the left side of the paper stack to support paper so that it feeds properly.
(4) Sheet Feeder Cover
Open to load paper in the Rear Tray.
(5) Rear Tray
Load paper here before printing. Paper feeds automatically, one sheet at a time.
(6) Cover Guide
Supports paper so that it feeds properly.
(7) Card Slot Cover
Open to insert a memory card.
(8) IrDA Port
Use this port to perform wireless printing through infrared communication.
(9) Direct Print Port
Connect your PictBridge compliant device, such as a digital camera, here to print directly from it.
You can also connect the Bluetooth Unit BU-20* to perform wireless printing through Bluetooth communication.
* The Bluetooth unit is not available to some regions due to the law of the countries or the regulations. For details, contact your local Canon Service representative.
(10) Paper Output Tray
Opens automatically when printing or copying starts, and supports the printout. Close it
when you are not using it.
(11) LCD (Liquid Crystal Display)
Displays messages, menu selections, and the operation status.
(12) Output Tray Extension
Supports output printouts.
(13) Operation Panel
Changes the settings and operates the machine.
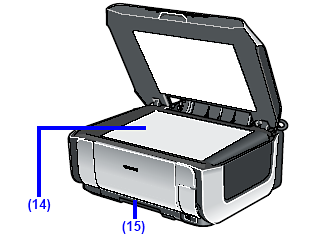
(14) Platen Glass
Load original documents to copy or scan here.
(15)Cassette
Load paper to be used regularly here. Paper feeds automatically, one sheet at a time.
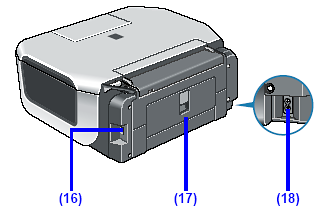
(16)USB Port
Plug in the USB cable connecting the machine to a computer here.
IMPORTANT
While the machine is printing from or scanning images to the computer, or the computer is in the sleep mode or standby mode, do not disconnect or connect the USB cable.
(17)Rear Cover
Open when removing jammed paper.
(18) Power Cord Connector
Plug in the supplied power cord here.
(19)Duplexing Transport Unit
Open when removing jammed paper after pulling out the Cassette.
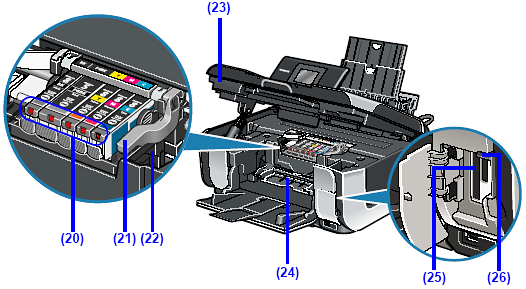
(20) Ink lamp
Lights or flashes red to indicate the status of the ink tank.
(21) Print Head Lock Lever
Locks the Print Head into place.
IMPORTANT
Do not pull up this lever after installing the Print Head.
(22) Print Head Holder
Holds the Print Head.
(23) Scanning Unit (Printer Cover)
Scans original documents. Open it when replacing the ink tanks or to remove jammed paper in the machine.
(24) Inner Cover
Close it when printing on paper.
(25)Card Slot
Set the memory card here.
(26)Access lamp
Lights or flashes to indicate the status of the memory card.
NOTE
For information on how to install the Print Head and ink tanks, refer to your setup sheet.
(1) ON/OFF button
Turns the machine on and off. Before turning the machine on, make sure the Document Cover is closed.
(2) Buttons to be used to navigate menus on the LCD
See "How to Navigate Menus on the LCD".
(3) Black button (top) / Color button (bottom)
Press the Black button to start black & white copying or photo scanning. Press the Color button to start color copying, photo printing, or scanning.
(4) Stop/Reset button
Cancels a print job in progress.
(5) Alarm lamp
Lights or flashes orange when an error, such as paper-out or ink-out, occurs.
(6) [+] [-] buttons
Specify the number of copies to copy or print.
(7) OK button
Finalizes your selection for the menu or setting item. Dismisses the error message and resumes the machine's normal operation after resolving a printing error or removing jammed paper.
(8) Power lamp
Lights or flashes green to indicate the power status.
(9) Paper Feed Switch
Press the Paper Feed Switch to change the paper source between them.
(10)Rear Tray lamp (top) / Cassette lamp (bottom)
These lamps indicate the currently selected paper source.


