Solution
You can scan 35 mm film strips and slides using the Copy, Print, Save, Scan-1 and Scan-2 buttons in CanoScan Toolbox. The procedures are similar for each button.
CAUTION
You cannot scan film with the Mail, OCR or PDF buttons.
1. Set the film on the scanner.
(1) Remove the protective sheet and film guide from the document cover, set film into the Film Guide, and then set the Film Guide to the document cover.
(2) Close the document cover.
IMPORTANT
To scan mounted negative slides and monochrome films, start ScanGear CS from an application program and use the Advanced Mode to scan.
2.Start CanoScan Toolbox.
Click the [Start] menu and select [(All) Programs], [Canon], [CanoScan Toolbox 4.6] and [CanoScan Toolbox 4.6].
3. Click a button on the CanoScan Toolbox main window to open the settings window for that button.
CanoScan Toolbox settings window will display.
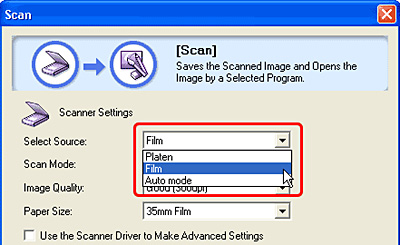
4. Select a [Select Source] option.
Film : You can select the Image Quality setting in this mode.
Auto mode : The film is scanned with an output resolution of 300 dpi. With the Copy function, the image is enlarged and printed at photo size (4"x6") in landscape orientation. Skip to Step 7 if you selected the Auto mode.
CAUTION
[Platen] is the default option for the [Select Source] category on the [Save] button. For this procedure, always select [Film] or [Auto mode].
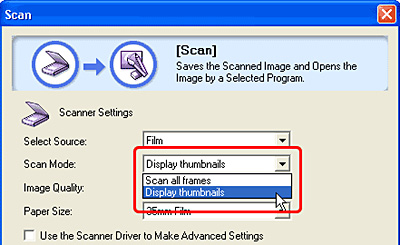
5. Select a [Scan Mode] option.
Scan all frames : Scans all the frames it detects. Up to 4 frames can be scanned.
Display thumbnails : Displays all the frames it detects as thumbnail images. You can remove the check marks from unwanted frames, so that only the required frames are included in the final scan.
6. Set the [Image Quality] if you selected Film in the Select Source category.
Standard (150 dpi) : Scans with an Image Quality of 150 dpi. Select this option to display the scanned image on a monitor or print at the photo size (4"x6").
Good (300 dpi) : Scans with an Image Quality of 300 dpi. Select this option to print a high-quality print at the photo size (4"x6").
Enlarged printing (600 dpi) : Scans with an Image Quality of 600 dpi. Select this option to print up to A4 (Letter) size, or for printing on a high performance color printer.
7. Click the [Scan] button.
If you selected the [Scan all frames] option, all frames will automatically be scanned.
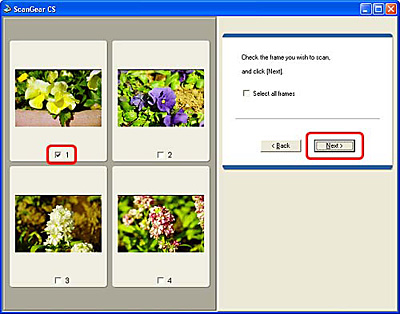
If you selected [Display thumbnails], the image thumbnails will display.
8. If you selected [Display thumbnails], place a check mark beside the frames you wish to scan, and click the [Next] button.
The selected images will be scanned, loaded into the application and saved.
9. After you have finished scanning film, put the protective sheet back on the document cover of the scanner.
CAUTION
Always put the protective sheet when you are not scanning films to protect the light source of the document cover.


