Solution
Removing the Paper Feeder
IMPORTANT
When moving or servicing the printer, remove the paper feeder and paper cassette.
2. If a USB cable is connected, turn the computer off, and then disconnect the USB cable from the printer.
3. Disconnect the power plug from the AC power outlet.
4. Remove the power cord from the printer.
5. If a LAN cable is connected, disconnect it from the network board.
6. Pull out the paper cassettes from the printer and paper feeder.
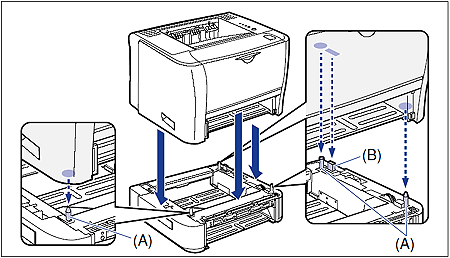
7. Lift the printer unit and remove it from the paper feeder.
Installing the Paper Feeder
1. Gently place the printer on the paper feeder so that each surface of the printer is flush with the front or side surfaces of the paper feeder.
Also, match the positioning pins (A) and connector (B) when placing the printer.
2. Set the paper cassettes in the printer and paper feeder.
3. Connect the LAN cable to the network board as needed.
4. Connect the power cord to the printer.
5. Plug the power plug into the AC power outlet.
6. Connect the USB cable to the printer as needed.
IMPORTANT
Be sure to turn the printer ON once when loading paper in the paper cassette for the first time after installing the paper feeder.
Precautions on Reinstalling the Paper Feeder
IMPORTANT
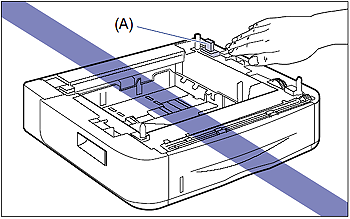
- Do not touch the connector (A) in the paper feeder. This may result in damage to the printer or misfeeds.
- Make sure that the front cover and multi-purpose tray are closed before carrying the printer.
- Do not install the paper feeder on a platform that may warp from the weight of the printer and optional accessories, or where the printer is liable to sink (such as a carpet or mat).
- If the printer cannot be placed on the paper feeder properly, lift the printer once, hold it horizontally, and place it again. If you try to place the printer forcefully without lifting it, the connector and positioning pins may be broken.