Scanning Films with ScanGear CS in Simple Mode
Solution
To scan 35 mm film strips and slides into an application program, you can start ScanGear CS from within the program.In the Simple Mode, there are only a few simple procedures.
IMPORTANT
- To scan mounted negative slides and monochrome films, start ScanGear CS from an application program and use the Advanced Mode to scan.
<PhotoStudio is used in this example>
1.Click the [Start] menu and select [(All) Programs], followed by [ArcSoft PhotoStudio 5.5] and [PhotoStudio 5.5].
2.Click the [File] menu and select [Acquire].
The ScanGear CS window will display.
5.If ScanGear CS is in the Advanced Mode, click the [Simple Mode] button on the bottom right of the window to switch to the Simple Mode.
You can select from the following options.
Negative Film (Color) / Positive Film (Color)
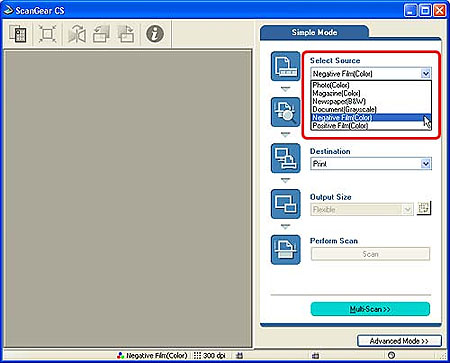
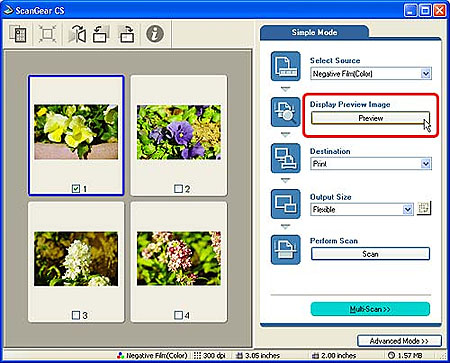
Thumbnails of the frames will display.
IMPORTANT
- If the previewed image does not display correctly, adjust the position of the film in the Film Guide and click the [Preview] button again.
- Do not open the document cover while a scan is in progress.
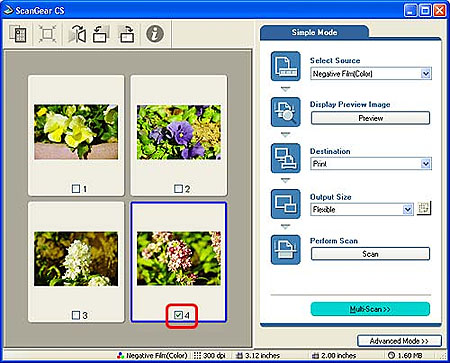
A check mark automatically appears on the first frame. If you do not need to scan a frame, click the check mark to remove it.
Select a frame (click it and the blue selection frame displays) and a Destination setting: either Image display or Print. When Image display is selected, the output resolution is set to 150 dpi. When Print is selected, it is set to 300 dpi. The Output Size options in the next step will vary according to the Destination setting selected.

REFERENCE
- More than one frame cannot be selected (blue selection frame) at the same time.
You can select from the following options.
| If "Print" is selected in step 9 | If "Image display" is selected in step 9 |
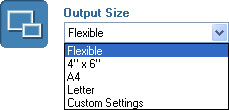 | 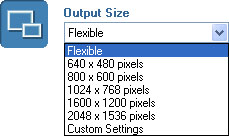 |
*Selecting Flexible enlarges 35 mm film to the Photo Size (4"x6").
* Selections Other than Flexible:
- When the Print option is selected, you can set the output size to match standard paper formats. The scan area is enlarged or reduced to fit the output to the specified paper size. You can set your own output sizes with the [Custom Settings] option.
- When you select Image display, you can select the Output Size according to its pixel dimensions (pixels are the picture elements used to display an image on a monitor). Since the pixel dimensions correspond to the dimensions of standard computer displays (monitors), you can use the images as "wallpaper" without adjustment. They also correspond to the dimensions to which digital camera images can be set, allowing you to manage and organize your scanned images along with digital camera images. You can specify the pixel dimensions of customized output sizes with the [Custom Settings] option.
REFERENCE
- Only the settings you add with the [Custom Settings] option can be deleted. The preset options cannot be deleted.
Steps 9 and 10 are conducted on each frame that is scanned.
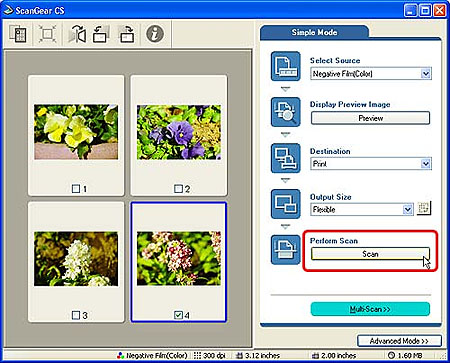
12.After the scan is complete, click the close box to close ScanGear CS.The image will display in the application program.
The image will display in the application program.
14.After you have finished scanning film, put the protective sheet back on the document cover of the scanner.
IMPORTANT
- Always put the protective sheet when you are not scanning films to protect the light source of the document cover.

