Printing images with borders

    22-Nov-2007
    8000781802

    Category : Tips
    Description : Printing images with borders
    Making Prints of Images Downloaded to Your Computer with the Borders (ZoomBrowser EX)


    Using ZoomBrowser EX, you can make prints with the date imprinted on images you have downloaded to your computer.

    Note:
    -
    ZoomBrowser EX from the supplied Solution Disk must be installed on your computer for this operation.
    -
    Operations for Windows Vista are explained here. Images displayed or operation might differ slightly in Windows XP and Windows 2000.
    -
    Please refer to the Related Information at the end of this page for information about importing images to the computer.
    -
    This page explains uses the case of printing one image on one sheet of paper as an example.
    -
    Some of the images that appear on this page contain a specific camera model name, however the actual model name varies depending on the camera used.


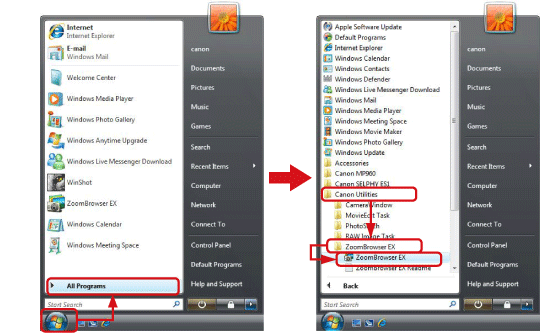
    1. Double-click the [ZoomBrowser EX] shortcut icon on your desktop to start [ZoomBrowser EX].


    If you cannot find the [ZoomBrowser EX] shortcut icon on your desktop, click [Start] () → [All Programs] or [Programs] → [Canon Utilities] → [ZoomBrowser EX] and select [ZoomBrowser EX] to start ZoomBrowser EX.


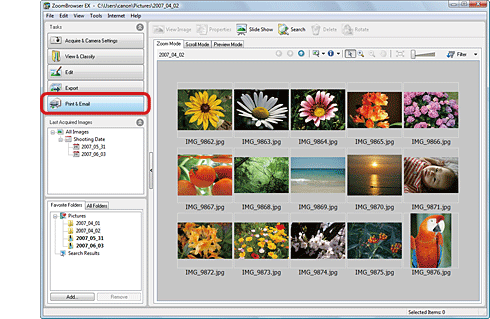
    2. When ZoomBrowser EX starts, click [Print & Email].


    3. Click [Photo Print].


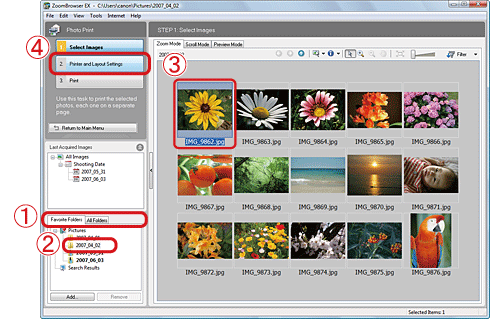
    4. The following screen appears, so make settings for printing.


    Click either the [Favorite Folders] tab or the [All Folders] tab.
    Select the folder that contains the images to print (Usually images are saved in the [Pictures] or [My Pictures]).
    Click the image to print.
    Click [Printer and Layout Settings].


    5. The following screen appears.


    Select the printer to use.
    Select the paper type and size.
    For printers that can print with a border, if you clear the [Borderless] check box (), you can print the image with the border.


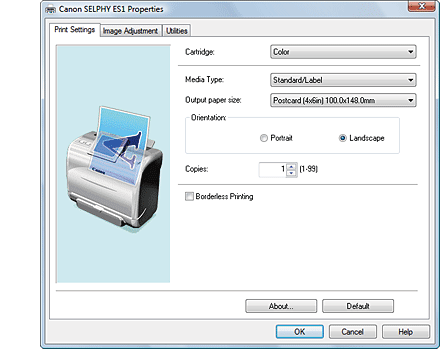
    If you click [Properties], the printer properties will be displayed and you can set up the paper type or image quality.


    The properties screen might differ depending on the printer you use.


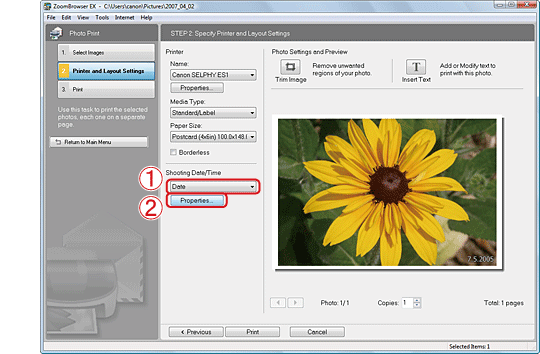
    6. The screen reverts to the screen shown below.


    If you wish to set up shooting date/time, select either [Date/Time], [Date], or [Time].
    Click [Properties] to change the position of the shooting date/time, text color, and separator.


    7. The following screen appears, so set the shooting date/time.


    Set the text color and separator.
    The settings made in will be displayed.
    Set the text position.
    Click [OK] to close this screen.


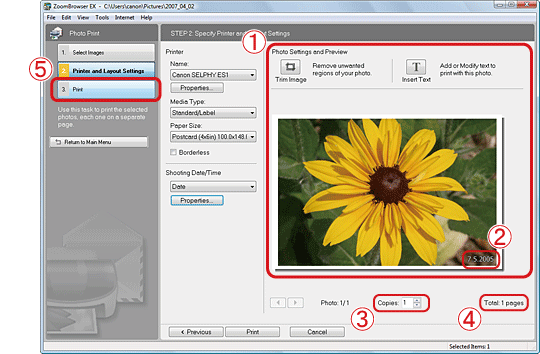
    8. The following screen appears.


    Check the image of the actual print in the [Photo Settings and Preview].
    If the shooting date/time is not recorded in the image, the date/time modified will be displayed. If the date/time is overlapped, select [None] in [Shooting Date/Time].
    Specify the number of copies.
    Confirm the number of prints.
    Click [Print] to start printing.


    This completes the process of making prints with date imprinted on images downloaded to your computer.