Images are blurry or not in focus (PowerShot SX70 HS)
Solution
If an image is blurry or cannot be brought into focus during shooting, try to switch to  mode.
mode.
mode. If focus can still not be achieved, please confirm the following.
IMPORTANT
The instructions in this section apply to a camera with the shooting mode set to [ Program AE :  ].
].
].Hold the camera securely to reduce camera shake.
- Place the strap around your neck.
- When shooting, keep your arms close to your body and hold the camera securely to prevent it from moving.

In low-light conditions, the Camera shake warning icon [  ] blinks when you press the Shutter button halfway. Refer to the following points to prevent camera shake.
] blinks when you press the Shutter button halfway. Refer to the following points to prevent camera shake.- Set the flash to [
 : Flash on ].
1. Turn the camera on.
2. Lift the flash.

3. Press the  button.
button.
4. Press the  / buttons to choose [ : Flash on ], and then press the
  button.
/ buttons to choose [ : Flash on ], and then press the button.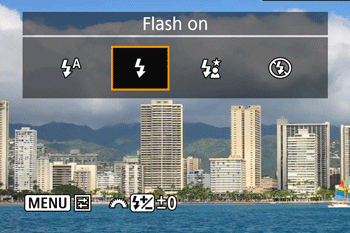

- Increase the [ISO speed].
1. Turn the camera on.
2. Press the button.
button.3. Press the  /
/  buttons, to choose
  .
.
/ buttons, to choose .

4. Press the / buttons, to choose a setting option.
/ buttons, to choose a setting option.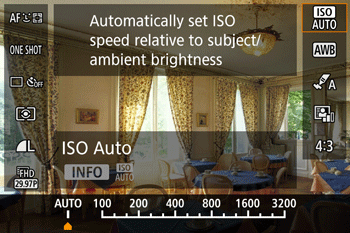
NOTE
Settings are available in the modes below.
 ,
,  ,
,  ,
,  ,
,  (Movie Manual Exposure)
- Set [IS mode] to [On].
1. Turn the camera on.
2. Press the  button.
button.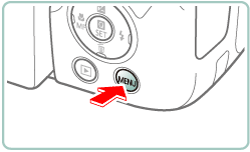
3. Move the zoom lever to choose the  tab.
tab.
tab.

4. Press the / buttons to choose the  tab.
tab.
/ buttons to choose the tab.

5. Press the / buttons to choose [ IS settings ], then press button.
/ buttons to choose [ IS settings ], then press button.

6. Press the / buttons to choose [ IS mode ], then press button.
/ buttons to choose [ IS mode ], then press button.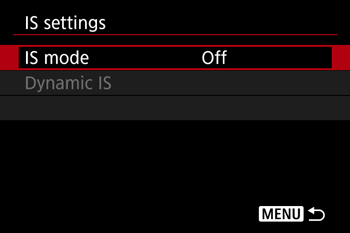
7. Press the / buttons to choose [ On ], then press button.
/ buttons to choose [ On ], then press button.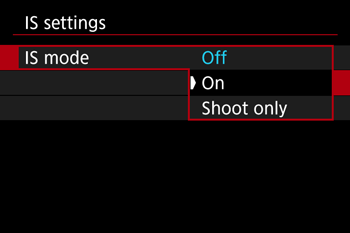
- Mount the camera on a tripod or take other measures to keep it still.
You should set [IS mode] to [Off] when using a tripod or other means to secure the camera.
NOTE
- If [Digital Zoom] is enabled, deactivate it by pressing the button, choosing tab, and then choosing [Off].
- Press the Shutter button halfway to focus on subjects before pressing it all the way down to shoot
Press the Shutter button halfway  (press lightly to focus) before pressing all the way down
  (press fully to shoot).
(press lightly to focus) before pressing all the way down (press fully to shoot). 

- Make sure subjects are within focusing range.
Shooting Range (measured from the tip of the lens)
| Shooting mode | Focus range | Maximum wide angle ( ) ) | Maximum telephoto ( ) ) |
| Same for when set to manual focus. | - | 0 cm (0.0 in.) - Infinity | 1.8 m (5.9 ft.) - Infinity |
| Other modes |  | 5 cm (2.0 in.) - Infinity | 1.8 m (5.9 ft.) - Infinity |
 | 0 – 50 cm (0.0 in. – 1.6 ft.) | - |
- Set [AF-assist Beam] to [On].
1. Turn the camera on.
2. Press the button.
button.3. Move the zoom lever to choose the tab.
tab.
4. Press the / buttons to choose the  tab.
tab.
/ buttons to choose the tab.
5. Press the / buttons to choose [ AF-assist beam firing ], then press button.
/ buttons to choose [ AF-assist beam firing ], then press button.
6. Press the / buttons to choose [ On ], then press button.
/ buttons to choose [ On ], then press button.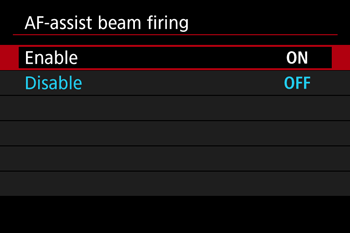
- Confirm that unneeded functions such as macro are deactivated.
1. Turn the camera on.
2. Press the  button, and then choose a Focus range suitable for your environment.
button, and then choose a Focus range suitable for your environment.

- Try shooting with AF lock.
1. Turn the camera on.
2. With the shutter button pressed halfway, press the button.
button. 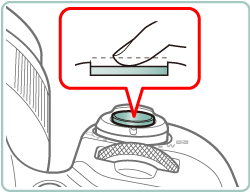
- The focus is now locked, and [MF] and the MF indicator are displayed.
3. Compose the shot and shoot.

NOTE
- Even if you remove your finger from the shutter button, the focus position is set and cannot be changed.
- To unlock the focus, press the
 button again, and choose [ ] or [
  ].
].
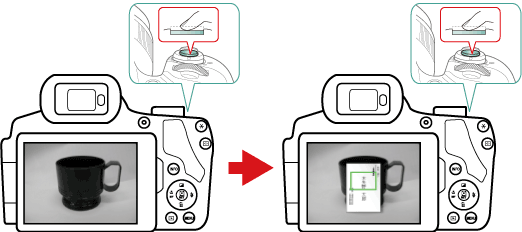
To have AF frames displayed and the camera focus correctly, try composing the shot with higher-contrast subject areas centered and then press the Shutter button halfway, or press the Shutter button halfway repeatedly.
-
 +Tracking
Examples of faces that cannot be detected:
- Subjects that are distant or extremely close
- Subjects that are dark or light
- Faces in profile, at an angle, or partly hidden
Note, that the camera may misinterpret non-human subjects as faces.
- Tracking AF
Tracking may not be possible when subjects are too small or move too rapidly, or when subject color or brightness matches that of the background too closely.
- Servo AF
Depending on the distance to the subject and the subject’s speed, the camera may not be able to achieve correct focus.
If the problem cannot be solved even after you checked all solutions above, the camera may be malfunctioning, so please contact Canon Customer support Help Desk.