
How to specify the paper size and page setup
Issue
This section describes the procedure for specifying the paper size or page setup when printing from an application, taking Adobe Reader 7.0 as an example.
NOTE
Clarifications of the operation and additional explanations for the procedure are indicated at the end of this page. Reading these notes is highly recommended.
Cause and Solution
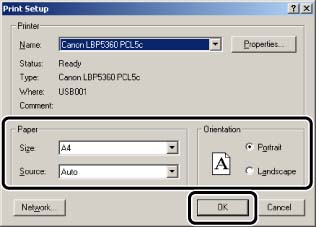
1. Open the PDF file to print with Adobe Reader, and then select [Print Setup] from the [File] menu.

2. Specify the paper size of the document and the printing orientation, then click [OK].
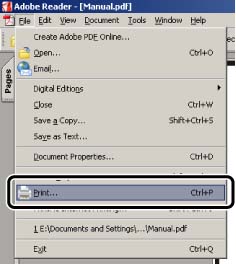
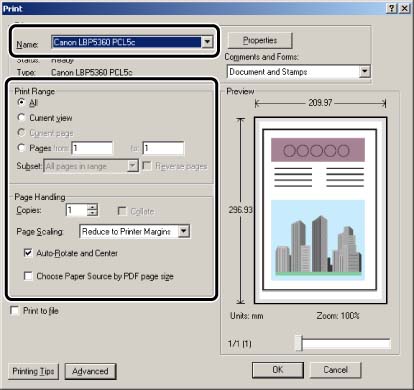
3. Select [Print] from the [File] menu.
4. Select the name of this printer for [Name] or [Printer Name], and then specify the printing preferences.
NOTE
The printer name displayed in this dialog box can be changed in the [Printers and Faxes] folder (the [Printers] folder for Windows 98/Me/2000).
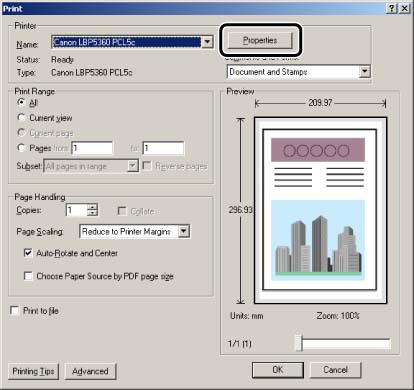
5. Click [Properties].
6. Display the [Page Setup] sheet and specify the paper size or page setup.
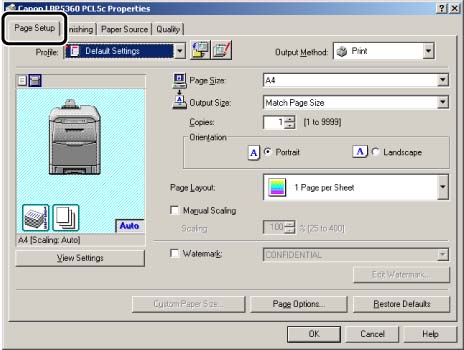
The [Page Setup] sheet allows you to specify the following printing preferences:
| Setting/Button | Contents |
| [Page Size] | Specifies the paper size prepared by the application. Specify the actual paper size to be printed in Output Size. |
| [Output Size] | Specifies the actual paper size to be printed. The scaling is set automatically according to the Page Size and the Output Size, when the Output Size is specified. If you select Match Page Size, the same size as specified under Page Size is selected automatically. * If the Output Size setting is different from the Page Size setting, the document is printed enlarged or reduced to fit the output size. |
| [Copies] | Specifies the number of copies to be printed. * Set the number of copies using either the printer driver or the application. |
| [Orientation] | Selects the layout to be printed in either portrait orientation or landscape orientation. - [Portrait] Select Portrait if the document layout is in portrait orientation. - [Landscape] Select Landscape if the document layout is in landscape orientation. |
| [Page Layout] |
- [N Pages per Sheet] (N = 1, 2, 4, 6, 8, 9, 16) Prints multiple pages on one sheet of paper. Some applications can print a document as a collated set of copies. Do not use this function with the N Pages per Sheet option. - [Poster [N x N]] (N = 2, 3, 4) Magnifies the image contained on the document page and prints it on multiple sheets of paper to create a poster-sized image. * Manual Scaling is disabled when Page Layout is set as other than 1 Page per Sheet. |
| [Page Order] | Specifies the page order layout on the printed sheet when multiple pages are printed on one sheet of paper. Select the page order layout from the drop-down list box. |
| [Manual Scaling] | Selecting this check box allows you to enter the value for scaling the printed document manually. When the specified paper sizes in Page Size and Output Size are standard paper sizes, scaling is set automatically. * If scaling can be set in the application, set the scaling to 100% in the printer driver, and then set the required scaling in the application. |
| [Watermark] | Selecting this check box allows you to select a watermark to print with the document. Select the watermark from the drop-down list box. |
| [Edit Watermark] | Clicking this button opens a dialog box for adding and modifying watermarks. |
| [Custom Paper Size] | Clicking this button opens a dialog box for specifying non-standard paper sizes. *This option can be specified only in the [Printer Properties] dialog box (Display from the [Printers and Faxes] folder. On Windows 98/Me/2000, display from the [Printers] folder). You cannot specify this option in the [Document Properties] dialog box (displayed in the application). |
| [Page Options] | Clicking this button opens a dialog box for selecting layout options and overlay features. |
[Custom Paper Size Settings] dialog box:
The following dialog box is displayed by clicking [Custom Paper Size].
This dialog box allows you to specify the height and width of custom paper size, which is different from the standard paper sizes.
NOTE
This option can be specified only in the [Printer Properties] dialog box (Display from the [Printers and Faxes] folder. On Windows 98/Me/2000, display from the [Printers] folder). You cannot specify this option in the [Document Properties] dialog box (displayed in the application).
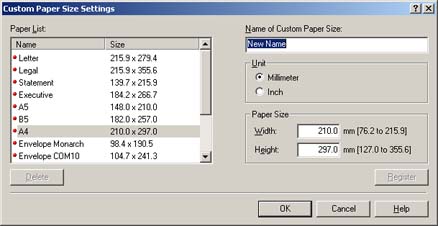
| Setting/Button | Contents |
| [Paper List] | The names and sizes of the standard paper sizes and custom paper sizes are displayed. The names with a dot mark cannot be deleted (standard paper sizes and Custom [Name Fixed]). *1 The custom paper sizes (except for Custom [Name Fixed]) can be used with printers installed on the computer you are using. *2 If you can specify the custom paper size in the application, Custom [Name Fixed] is used temporarily as the custom paper size you specified in the application. |
| [Name of Custom Paper Size] | Specifies the name of the custom paper. You can enter a maximum of 31 characters. |
| [Unit] | Specifies the unit (millimeters or inches) to use for setting the size of the custom paper. |
| [Paper Size] | Specifies the height and width for the custom paper. Enter the values for the height and width of the paper size in portrait orientation, where the height should be longer than width. The value should be within the range of possible sizes, which varies depending on the printer you use. * See "Available Page Sizes for Printing" in the help file for the range of possible sizes for custom paper sizes |
| [Delete] | Deletes the custom paper size selected in the Paper List. * You cannot delete the standard paper sizes, Custom [Name Fixed], or paper sizes currently specified as Paper Size or Output Size in the Page Setup sheet. |
| [Register] | Registers custom paper sizes. The custom paper size appears in the Paper List. * The registered custom paper size can be used with all printers installed on the computer you are using. |
[Edit Watermark] dialog box:
The following dialog box is displayed by clicking [Edit Watermark].
This dialog box allows you to add new watermarks and edit the added watermarks.
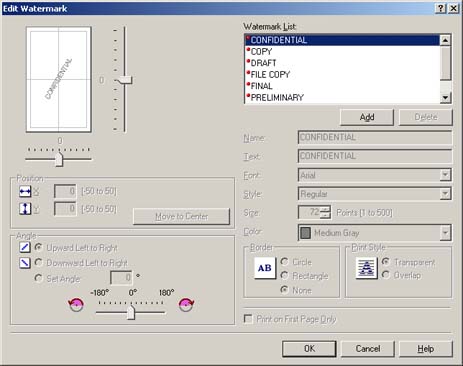
| Setting/Button | Contents |
| [Position] | Specifies the position to print the selected watermark on the document. Enter an X and Y axis value between -50 and 50 (the center of the paper is defined as 0 (zero)). Or, drag the slider indicators at the bottom and right of the Preview area to specify the position. |
| [Move to Center] | Clicking this button moves the watermark to the center of the document. |
| [Angle] | Specifies the angle to print the selected watermark on the document. Select Upward Left to Right, Downward Left to Right, or select Set Angle to enter the degree of the angle in the box (the horizontal position is defined as 0 (zero)). You can also drag the slider indicator to specify the angle. |
| [Watermark List] | Displays a list of registered Watermarks. The preset watermarks are identified by a red dot. You cannot modify these watermarks. |
| [Add] | Clicking this button adds the newly defined watermark to the Watermark List list box. |
| [Delete] | Clicking this button removes the watermark selected in the Watermark List list box (default watermarks cannot be deleted). |
| [Name] | Defines the name which is displayed in the Watermark drop-down list box in the Page Setup sheet. |
| [Text] | Defines the characters which make up a watermark. |
| [Font] | Specifies the font for a watermark (only available for TrueType fonts). |
| [Style] | Specifies the font style for the watermark. The style can be selected from the following: - [Regular] - [Italic] - [Bold] - [Bold Italic] |
| [Size] | Specifies the font size for a watermark. |
| [Color] | Specifies the color for a watermark. For black-and-white printing, the watermark is printed in grayscale when colors such as Red or Green are selected. |
| [Border] | Specifies whether a border encloses the watermark when printed. Either a Circle border or a Rectangle border can be selected. |
| [Print Style] | Specifies the density for a watermark. - [Transparent] Prints a watermark as a shaded image. The document is seen through the watermark. - [Overlap] Prints a watermark as a solid image. The document cannot be seen where the watermark is overlaid. |
| [Print on First Page Only] | Selecting this check box prints the watermark only on the first page of the document. |
[Page Options] dialog box:
- [Layout Options] sheet
The following dialog box is displayed by clicking [Page Options].
This dialog box allows you to specify borders, date, and page numbers, etc. to be printed on the printouts.
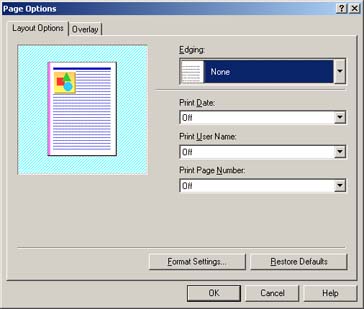
| Setting/Button | Contents |
| [Edging] | Specifies the type of edging to print as a page border. |
| [Print Date] | Specifies the position of the date to print on the document. When Off is selected, the date will not be printed. |
| [Print User Name] | Specifies the position of the user name registered on your computer to print on the document. When Off is selected, the user name will not be printed. |
| [Print Page Number] | Specifies the position of the page numbers to print on the document. When Off is selected, the page numbers will not be printed. |
| [Format Settings] | Clicking this button opens a dialog box for setting the font format for the Date, User Name, and Page Number to be printed on the document. |
[Format Settings] dialog box:
The following dialog box is displayed by clicking [Format Settings] in the [Page Options] dialog box.
This dialog box allows you to specify the font for printing date and page number.
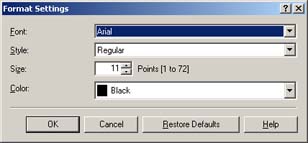
| Setting/Button | Contents |
| [Font] | Specifies the font for printing Date, User Name, and Page Number (only available for TrueType fonts). |
| [Style] | Specifies the font style for printing Date, User Name, and Page Number. The style can be selected from the following: - [Regular] - [Italic] - [Bold] - [Bold Italic] |
| [Size] | Specifies the font size for printing Date, User Name, and Page Number. |
| [Color] | Specifies the color for printing Date, User Name, and Page Number. For black-and-white printing, text is printed in grayscale when colors such as Red or Green are selected. |
- [Overlay] sheet
The following screen is displayed by clicking the [Overlay] tab in the [Page Options] dialog box.
Overlay Printing overlays text data onto a form file.
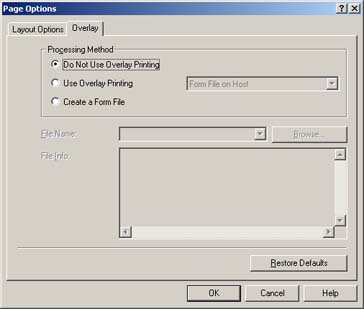
| Setting/Button | Contents |
| [Processing Method] | Specifies whether to print the document using Overlay Printing. [Do Not Use Overlay Printing] Prints the document normally without overlay printing or creation of a form file. [Use Overlay Printing] Prints the document with the selected form file. Select the form file to be used as an overlay by clicking the Browse button. Depending on the printer model you are using, you can select a form file type from among the following. - [Form File on Host] Uses a form file stored in the computer, which was created using the printer driver function. - [Form File on Device] or [Form File [PDL data] on Device] Uses a form file downloaded to the printer using Canon NetSpot Resource Downloader. - [Form File [Image data] on Device] Uses a form file stored as image data in the printer. [Create a Form File] Creates an overlay form file for Overlay Printing. Specify the overlay form file by clicking the Browse button. Depending on the printer model you are using, you can select whether to store the form file in the computer or the printer. - [Stored in Host] Stores the form file in the computer. - [Stored in Device] Stores the form file in the printer. If the form file is stored at the printer, enter the file name. *1 The document to be printed and the form file should have the same settings for the following parameters displayed in File Info. - Output Size - Orientation - Color Mode *2 If the document has multiple pages, forms are overlaid on all pages. |
| [File Name] | When Use Overlay Printing is selected under Processing Method, the File Name text box displays the selected overlay form file. To select an overlay form file, click the Browse button. When you want to use a form file stored in the printer, enter the file name here. However, this may not be possible, depending on the printer you are using. When Create a Form File is selected under Processing Method, use the File Name text box to specify the name of the file. To specify an overlay form file, click the Browse button. When you want to store a form file in the printer, enter the file name here. However, this may not be possible, depending on the printer you are using. |
| [File Info] | Displays information about the overlay form file displayed in File Name when Use Overlay Printing is selected under Processing Method. Confirm that the output size and orientation are the same as those of the document to be overlaid. |
| [Browse] | Clicking this button allows you to specify or select an overlay form file for File Name. |
NOTE
The settings that are specified here only apply to the currently opened file. Check the contents of the [Document Properties] dialog each time you print. In particular, it is recommended that you confirm the contents of the [Page Setup] sheet and the [Paper Source] sheet.
7. Confirm the settings, then click [OK].
The [Print] dialog box reappears.
Click [OK] in the [Print] dialog box. Then, the printer starts printing.
NOTE
a. The screen shots used in this section are from Windows 2000 on which PCL 5c Printer Driver is used.
b. The procedure for displaying the [Document Properties] dialog box may differ depending on the application you are using.
c. The default settings for all files can be configured using the following dialog box.
- For Windows 2000/XP/Server 2003: Open the [Document Properties] dialog box from the [Printers and Faxes] folder or the [Printers] folder.
- For Windows 98/Me: Open the [Printer Properties] dialog box from the [Printers] folder.
d. "Driver Guide" (PDF manual) in the CD-ROM supplied with the printer describes how to use the various functions of the printer and printer driver. By specifying the settings for the printer and printer driver for each job, you can make the best use of the printer and its functions