Issue
Time to Replace a Toner Cartridge:
You can check the time to replace the toner cartridges in the Printer Status Window. For details on the time to replace the toner cartridges, see "Time to Replace a Toner Cartridge" in Related Information at the end of this page.
Cause and Solution
How to Replace a Toner Cartridge:
IMPORTANT
When you are replacing a toner cartridge, be sure to use the toner cartridge designed for this printer. When you purchase a replacement toner cartridge, contact your local authorized Canon dealer.
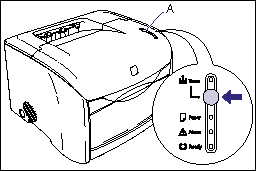
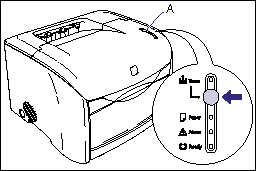
1. Hold down the toner replacement key (A) for 2 seconds.
The toner cartridge holder rotates, moving the spent toner cartridge to a position where it can be removed.
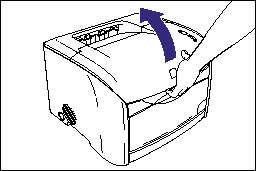
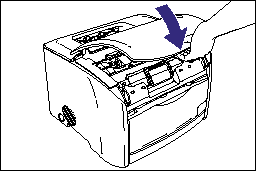
2. Open the top cover of the printer after the operating sound of the printer stops.
Holding the opening of the top cover, open it until it stops.
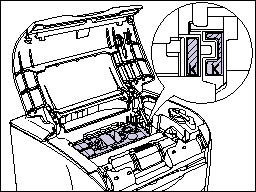
3. Make sure that the toner cartridge you want to replace is in the replacement position.
If the toner cartridge you want to replace is not in the replacement position, close the top cover of the printer and wait for the sound of printer operation stops, then open the cover again. Continue to open and close the top cover until the toner cartridge you want to replace has moved into the replacement position.
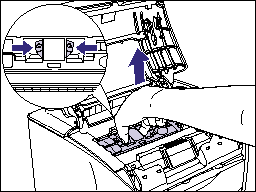
4. Remove the toner cartridge from the printer.
Holding the grip on the toner cartridge, lift it straight up.
5. Take a new toner cartridge of the same color as that of the replacement cartridge out of the protective bag.
Use scissors to open the protective bag so as not to damage the toner cartridge.
IMPORTANT
a. Keep the protective bag for the toner cartridge. It will be required after taking out the toner cartridge for printer maintenance.
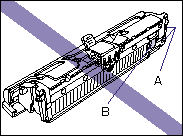
b. Be careful not to hold or touch sensitive areas such as the sensor (A) or electrical contacts (B), as this may damage the toner cartridge or printer.
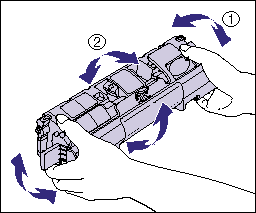
6. Hold the toner cartridge as shown in the figure, shake it gently 5 or 6 times from side to side (1), then back and forth (2) to evenly distribute the toner inside the cartridge.
IMPORTANT
a. If the toner is not distributed evenly, this may result in deterioration in print quality. Be sure to perform this step properly.
b. Be sure to shake the toner cartridge gently. If you do not shake the cartridge gently, toner may spill out.
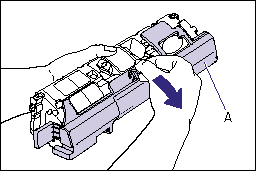
7. Remove the protective cover.
Holding the tab of the protective cover (A), remove it as shown in the figure.
IMPORTANT
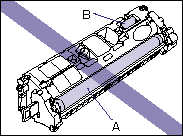
a. Do not hold or touch the developing roller (A), as this may result in deterioration in print quality. Do not jolt the toner cartridge memory (B) or bring it near a magnetic field, as this may result in damage to the cartridge.
b. Keep the protective cover. It will be required after taking out the toner cartridge for printer maintenance.
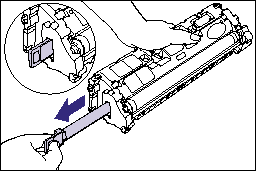
8. Place the toner cartridge on a flat surface, then pull out the sealing tape (approx. 45 cm in length) gently while supporting the toner cartridge.
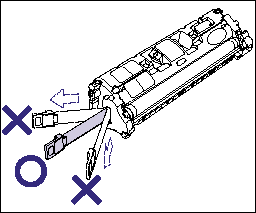
To pull out the sealing tape, hold the tab at the end of it, and then pull it out straight in the direction of the arrow.
IMPORTANT
a. Do not pull the sealing tape diagonally, upwards, or downwards. If the tape is severed, it may become difficult to pull out completely.
b. Pull out the sealing tape completely from the toner cartridge. If any tape remains in the toner cartridge, this may result in poor print quality.
c. Dispose of the sealing tape according to local regulations.
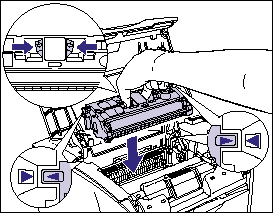
9. Holding the grip on the toner cartridge, install it into the printer.
Align "Triangular Mark" on the toner cartridge with "Triangular Mark" on the printer when you insert the drum cartridge.
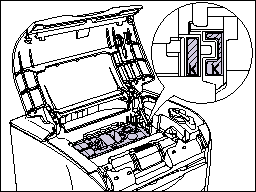
When the toner cartridge is installed properly, the labels on the toner cartridge and the toner cartridge holder will line up as shown in the figure.
10. Close the top cover.
Holding the opening of the top cover, close it gently.
The toner cartridge holder rotates automatically.
IMPORTANT
Even when you are using new toner cartridges, toner may adhere to the toner cartridges and the areas around the toner cartridges when you open and close the top cover. This has no effect on printer operation, printing quality, or toner consumption, and the printer can be used as it is.
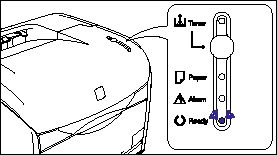
11. Hold down the Toner Replacement key (A) for 2 seconds after the sound of printer operation stops.
The Toner indicator goes off after a short period of time, and the Ready indicator (blue) comes on.
