How to Clean the Interior of the Machine (MF4680)
Solution
Note the following before cleaning your machine:
- Make sure no document is stored in memory, then turn off the main power switch and disconnect the power cord.
- Use a soft cloth to avoid scratching the components.
- Do not use tissue paper, paper towels, or similar materials for cleaning; they can stick to the components or generate static charges.
CAUTION
Never use volatile liquids such as thinners, benzene, acetone, or any other chemical cleaner to clean the machine. These can damage the machine components.
NOTE
When you turn off the main power switch, the documents stored in memory will be erased.
1. Turn off the main power switch and disconnect the power cord.
2. Lift the scanning platform (A) until it is locked. (You will hear an audible [click].)
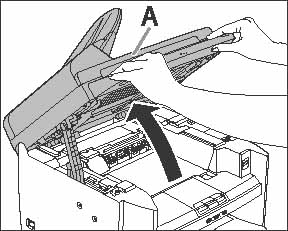
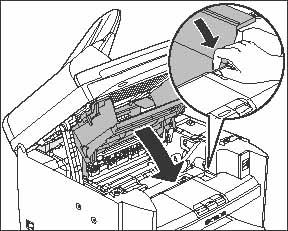
3. Open the toner cover (B), using the tab (A) which covers over on dent.
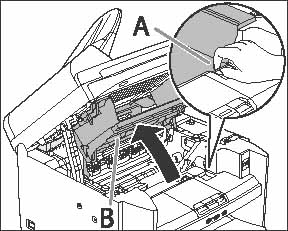
(B): Toner cover
4. Remove the toner cartridge.
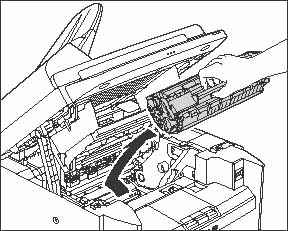
CAUTION
a. To avoid exposing the toner cartridge to light, place it in its protective bag or wrap it in a thick cloth.
b. Do not open the drum protective shutter on the toner cartridge. Print quality may deteriorate if the drum surface is exposed to light or is damaged.
NOTE
Always hold the toner cartridge by its handle.
5. Use a clean, soft, dry, lint-free cloth to remove any toner or paper debris from the machine's interior.
CAUTION
a. Do not touch the fixing assembly (A) as it becomes very hot during use.
b. Do not touch the transfer roller (B) as this can damage the machine.
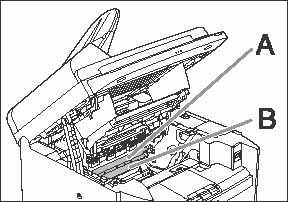
(A): Fixing assembly
(B): Transfer roller
c. If loose toner comes into contact with your skin or clothing, wash with cold water. Warm water will set the toner.
6. Hold the toner cartridge by its handle.
The arrow (A) on the toner cartridge should be facing away from you and pointing down.
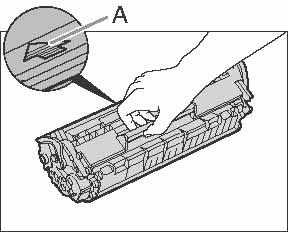
(A): Arrow
CAUTION
Do not open the drum protective shutter on the toner cartridge. Print quality may deteriorate if the drum surface is exposed to light or is damaged.
NOTE
Always hold the toner cartridge by its handle.
7. Insert the cartridge so that the protrusion (A) on the right side of the toner cartridge fits into the guide (B) located on the right side of the machine and slide it down parallel to the guide.
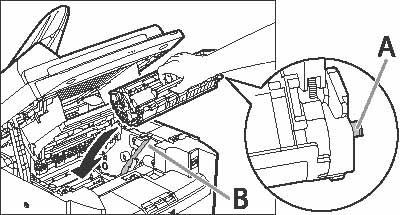
(B): Guide
8. Push the toner cartridge to make sure it is properly set in the machine.
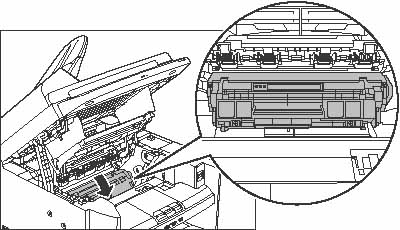
9. Close the toner cover using the tab.
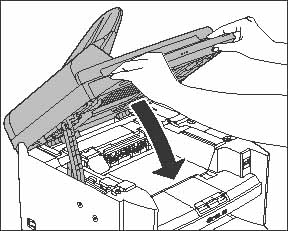
10. Lower the scanning platform.
CAUTION
Be careful not to get your fingers caught.
11. Reconnect the power cord and turn on the main power switch.

