How to share the printer in Windows 7
Solution
CAUTION
How to specify printer sharing setting varies depending on the OS type combinations between the print server and the client PC.
You can share the printer connected to the printer server (A) with the client PC (B) connected to the same network.
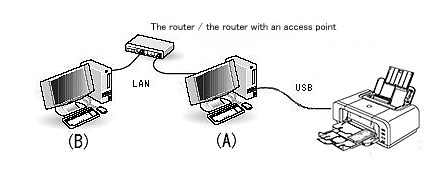
(A) Print sever
(B) Client PC
REFERENCE
The computer directly connected to the printer with a USB cable is called "Print server" (A) and the computer on which printing operation is actually performed is called "Client PC."
<Setup flow>
Follow the steps below to enable printer sharing.
1. Complete the printer sharing settings on the Printer server.
2. Confirm the computer name of the print server.
3. Add the printer to be shared to the client PC as a new printer.
CAUTION
Log in as an Administrator to perform the setup.
Canon iP4700 Series is used as an example of the printer to be shared.
- Preparations -
Both Print server and Client PC must have either of the following drivers installed, namely the one downloaded from Canon website or the one included in the OS. Which driver you should install in depends on the printer / OS.
For details, see our website.
- To install the downloaded driver in the client PC, check "Select printer port" in the Installation Complete window, then select LPT1 in "Manual Selection" to complete the installation.
- To install the driver included in the OS in the client PC, select LPT1 in "Add Printer" to complete the installation.
1. Complete the printer sharing settings on the Printer server.
Let's make the printer connected to the print server available to other computers.
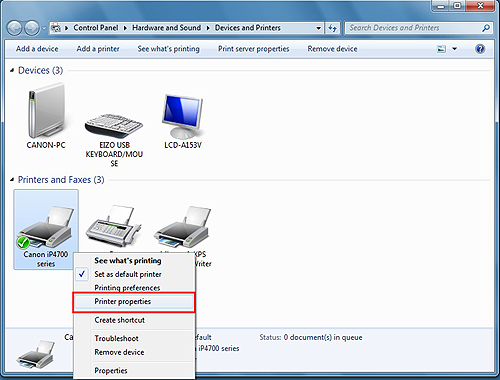
1-1. From the Start menu, select [Devices and Printers] .

REFERENCE
The screen looks different depending on the environment you are using.
1-2. Right-click the Canon iP4700 Series icon, then select "Printer Properties" .
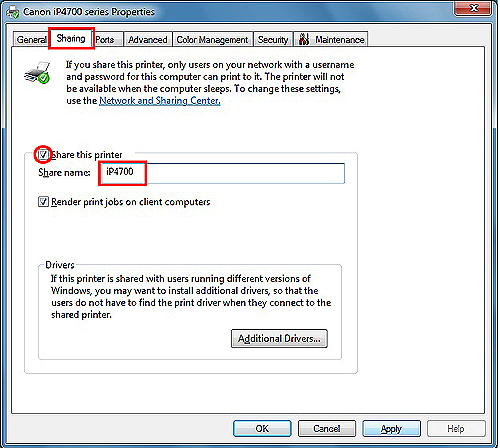
1-3. Select the Sharing tab, check "Share this printer", and then enter the name of the printer you want to share in "Share name".
After you enter the name, click "Apply" then "OK" to close Properties.
IMPORTANT
- The iP4700 is an example.
- Make sure to write down the "words" you entered in Share name. You will need it when doing the setup for the client server.
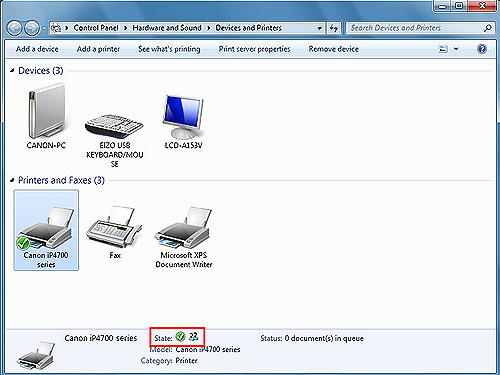
1-4. Confirm that the following kind of mark is displayed in "State" in the bottom of the window.
2. This is necessary when you specify the printer in the step 3 below.
2-1. From the Start menu, right-click "Computer", then click "Properties".

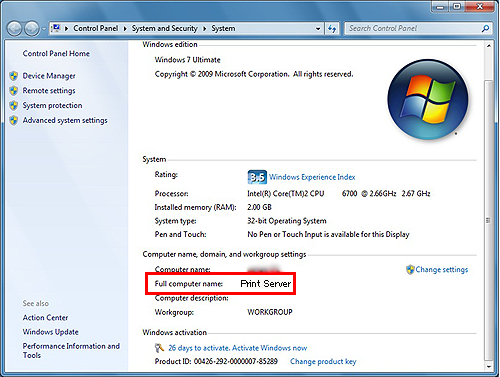
2-2. Confirm the Full computer name.
IMPORTANT
"Print Server" is an example.
Make sure to write down the "words" in Full computer name. You will need it when doing the setup for the client server.
3. Add the printer to the client PC as a new printer.
Make the client PC recognize the printer on the network.
3-1. From the Start menu, select "Computer", "Network", then "Add a printer".

The Add Printer window is displayed.
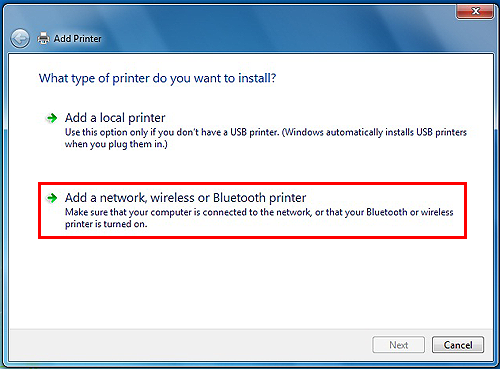
3-2. Select "Add a network, wireless or Bluetooth printer".
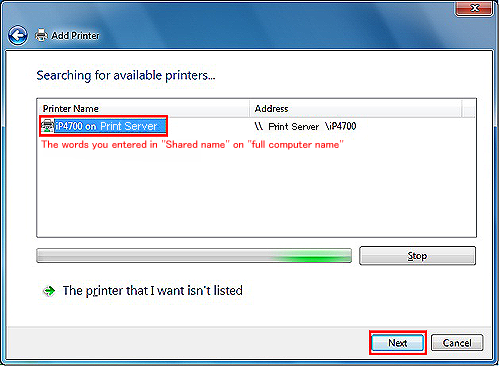
3-3. Click the icon of the printer specified on the print server, click "Next".
IMPORTANT
If the printer icon is not displayed, check the connection with the print server. If the problem persists, confirm whether the account (administrative privileges) of the print server is surely specified on the client PC.
(It may take time to display the printer icon.)
3-4. After following the instructions on the window, click "Finish".
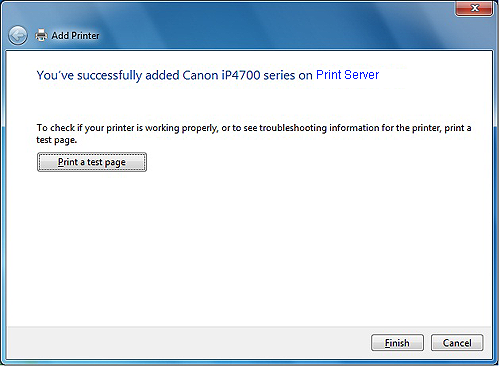
The end of all the settings.
When the client PC is Windows XP 32bit and the print server is Windows 7 64bit, or when the client PC is Windows XP 64bit and the print server is Windows 7 32bit
Canon iP4600 Series is used as an example of the printer to be shared.
- Preparations -
Both Print server and Client PC must have either of the following drivers installed, namely the one downloaded from Canon website or the one included in the OS. Which driver you should install in depends on the printer / OS.
For details, see our website.
- To install the downloaded driver in the client PC, check "Select printer port" in the Installation Complete window, then select LPT1 in "Manual Selection" to complete the installation.
- To install the driver included in the OS in the client PC, select LPT1 in "Add Printer" to complete the installation.
1. Complete the printer sharing settings on the Printer server.
Let's make the printer connected to the print server available to other computers.
1-1. From the Start menu, select "Devices and Printers" .

REFERENCE
The screen looks different depending on the environment you are using.
1-2. Right-click the Canon iP4600 Series icon, then select "Printer Properties"
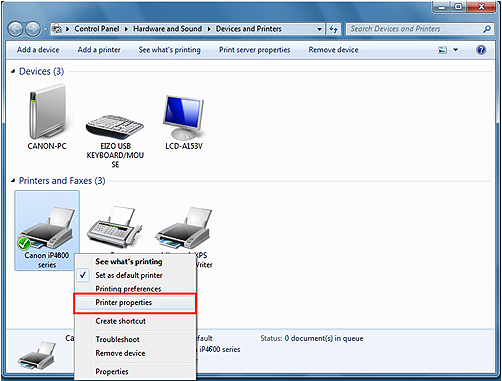
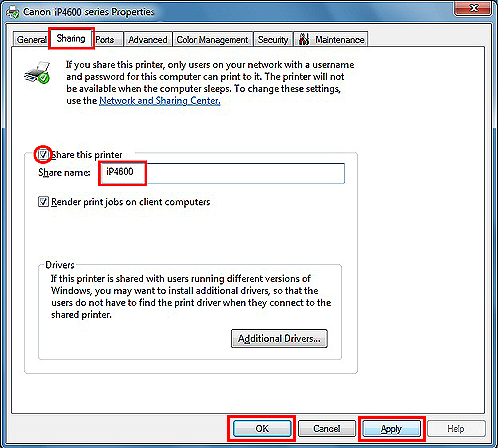
1-3. Select the Sharing tab, check "Share this printer", and then enter the name of the printer you want to share in "Share name".
After you enter the name, click "Apply" then "OK" to close Properties.
IMPORTANT
- The Canon iP4600 Series is an example.
- Make sure to write down the "words" you entered in Share name. You will need it when doing the setup for the client server.
1-4. Confirm that the following kind of mark is displayed in "State" in the bottom of the window. In this case, the mark indicates that iP4600 series get ready to be shared.

2. Confirm the full computer name of the print server.
This is necessary when you specify the printer in the step 3 below.
2-1. From the Start menu, right-click "Computer", then click "Properties".

2-2. Confirm the Full computer name.

IMPORTANT
"Print Server" is an example.
Make sure to write down the "words" in Full computer name. You will need it when doing the setup for the client server.
3. Add a shared printer to the client PC as a new printer.
Add a shared printer on the network to the client PC as a new printer.
3-1. From the Start menu, select "Printers and Faxes" .

3-2. Right-click "Canon iP4600 Series" icon, then select Properties.
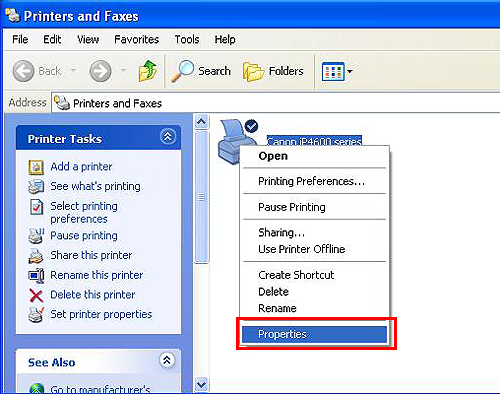
3-3. Select the "Ports" tab, then click "Add Port".
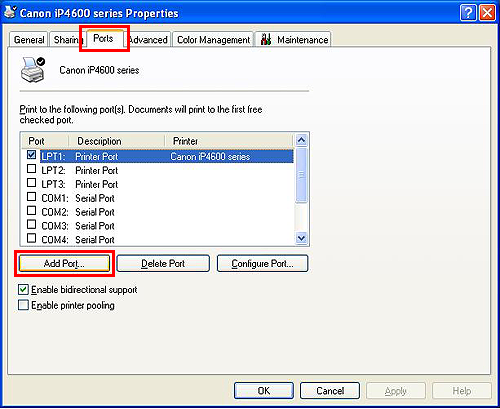
3-4. Select "Local Port" , then click "New Port".
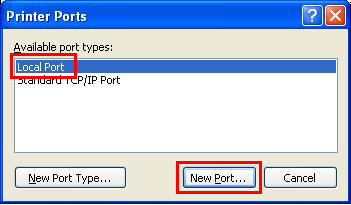
3-5. In the "Port Name" window, enter the shared printer name following the format below, then click "OK":

 Computer name of the Print server
 Shared printer name
REFERENCE
- The computer name of the print server is the "Full computer name" you confirmed in the Step 2-2.
- The shared printer name is the name you entered in "Share name" in the Step 1-3.
- If you cannot perform the connection successfully, the sharing setting between the print server and the client PC (the setting on the OS) may not be specified properly.
In this case, Microsoft recommends that the same accounts and passwords be added
to all the computers on the network.
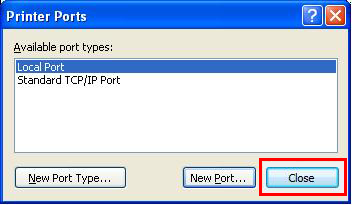
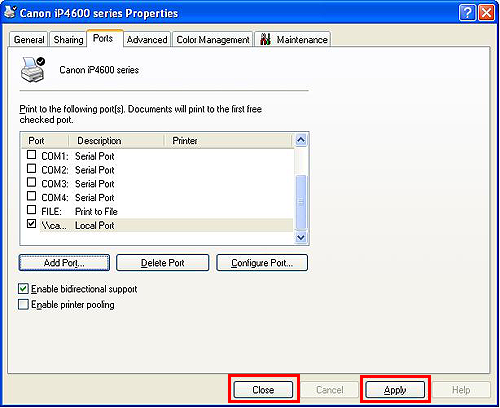
3-6. In the "Printer Port" window, select "Close", then click "Apply" → "Close" Close in "Printer ProPerties" .
The end of all the settings.
When the client PC is Windows XP 32 bit and the print server is Windows 7 32 bit, or the client PC is Windows XP 64 bit and the print server is Windows 7 64 bit
Canon iP4700 Series is used as an example of the printer to be shared.
- Preparations -
Both Print server and Client PC must have either of the following drivers installed, namely the one downloaded from Canon website or the one included in the OS. Which driver you should install in depends on the printer / OS.
For details, see our website.
- To install the downloaded driver in the client PC, check "Select printer port" in the Installation Complete window, then select LPT1 in "Manual Selection" to complete the installation.
- To install the driver included in the OS in the client PC, select LPT1 in "Add Printer" to complete the installation.
1. Complete the printer sharing settings on the Printer server.
Let's make the printer connected to the print server available to other computers.
1-1. From the Start menu, select "Devices and Printers" .

REFERENCE
The screen looks different depending on the environment you are using.
1-2. Right-click the Canon iP4700 Series icon, then select "Printer Properties"
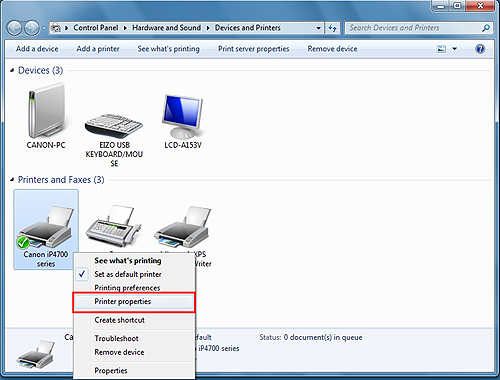
1-3. Select the Sharing tab, check "Share this printer", and then enter the name of the printer you want to share in "Share name".
After you enter the name, click "Apply" then "OK" to close Properties.

REFERENCE
- The Canon iP4700 Series is an example.
- Make sure to write down the "words" you entered in Share name. You will need it when doing the setup for the client server.
1-4. Confirm that the following kind of mark is displayed in "State" in the bottom of the window. In this case, the mark indicates that iP4700 series get ready to be shared.

2. Confirm the full computer name of the print server.
This is necessary when you specify the printer in the step 3 below.
2-1. From the Start menu, right-click "Computer", then click "Properties".

2-2. Confirm the Full computer name.

IMPORTANT
"Print Server" is an example.
Make sure to write down the "words" in Full computer name. You will need it when doing the setup for the client server.
3. Add the printer to the client PC as a new printer.
Make the client PC recognize the printer on the network.
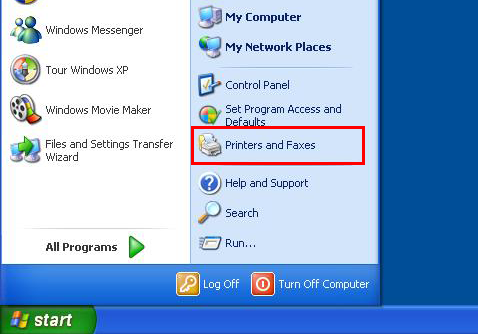
3-1. From the Start menu, select "Printers and Faxs".
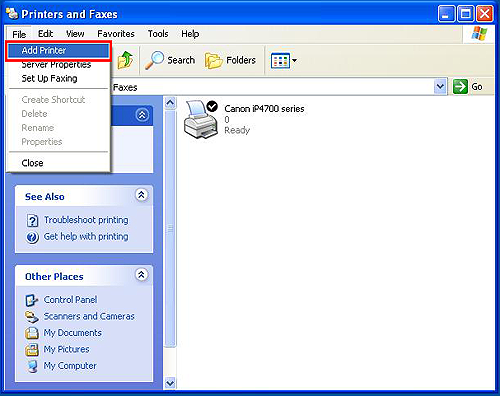
3-2. From the file menu, select Add Printer.
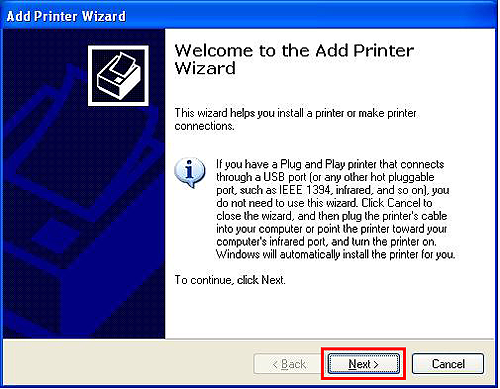
3-3. The Add Printer Wizard will be displayed.
Click Next.
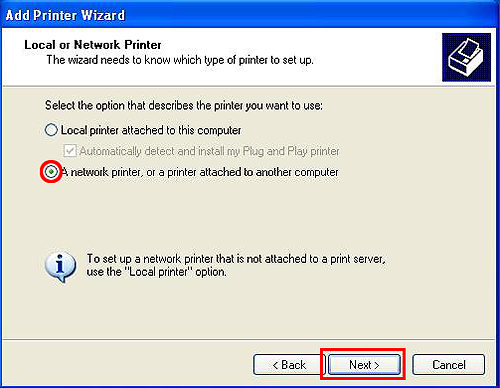
3-4. Check "A network Printer, or a printer attached to another printer," then click Next.
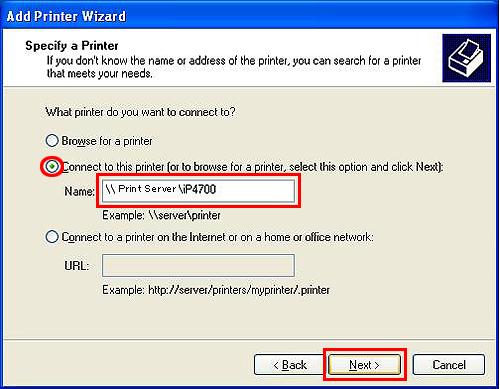
3-5. Check "Connect to this Printer (or to browse for a printer, select this option and click Next)," enter the full computer name and the share name you confirmed in the step 2-2 and 1-3 in "name" respectively.
Click Next.
IMPORTANT
If you cannot proceed to the next step even after clicking Next, check the connection with the print server. If the problem persists, confirm whether the account (administrative privileges) of the print server is surely specified on the client PC.
(It may take time to display the printer icon.)
3-6. Click Yes.

3-7. After following the instructions on the window, click "Finish".
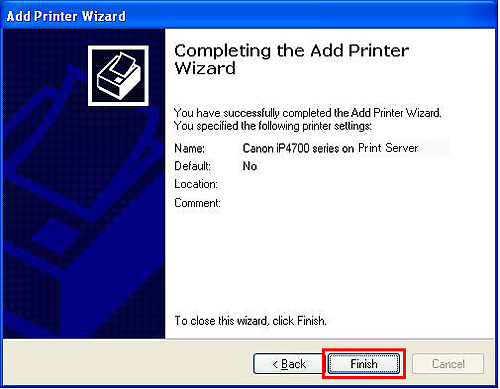
The end of all the settings.
When the client PC is Windows Vista 32 bit and the print server is Windows 7 64 bit, or when the client PC is Windows Vista 64 bit and the print server is Windows 7 32 bit
Canon iP4600 Series is used as an example of the printer to be shared.
- Preparations -
Both Print server and Client PC must have either of the following drivers installed, namely the one downloaded from Canon website or the one included in the OS. Which driver you should install in depends on the printer / OS.
For details, see our website.
- To install the downloaded driver in the client PC, check "Select printer port" in the Installation Complete window, then select LPT1 in "Manual Selection" to complete the installation.
- To install the driver included in the OS in the client PC, select LPT1 in "Add Printer" to complete the installation.
1. Complete the printer sharing settings on the Printer server.
Let's make the printer connected to the print server available to other computers.
1-1. From the Start menu, select "Devices and Printers" .

REFERENCE
The screen looks different depending on the environment you are using.
1-2. Right-click the Canon iP4600 Series icon, then select "Printer Properties"

1-3. Select the Sharing tab, check "Share this printer", and then enter the name of the printer you want to share in "Share name".
After you enter the name, click "Apply" then "OK" to close Properties.

IMPORTANT
- The Canon iP4600 Series is an example.
- Make sure to write down the "words" you entered in Share name. You will need it when doing the setup for the client server.
1-4. Confirm that the following kind of mark is displayed in "State" in the bottom of the window. In this case, the mark indicates that iP4600 series get ready to be shared.

2. Confirm the full computer name of the print server.
This is necessary when you specify the printer in the step 3 below.
2-1. From the Start menu, right-click "Computer", then click "Properties".

2-2. Confirm the Full computer name.

IMPORTANT
"Print Server" is an example.
Make sure to write down the "words" in Full computer name. You will need it when doing the setup for the client server.
3. Complete the printer sharing settings on the Printer server.
Let's make the printer connected to the print server available to other computers.
3-1. From the Start menu, select "Control Panel", "Hardware and Sound", then "Printers".
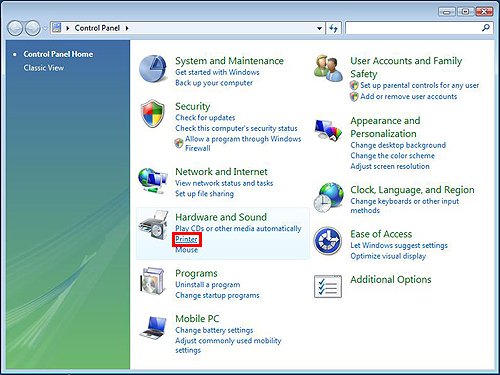
3-2. Right-click the "Canon iP4600 Series" icon, then select "Properties".

3-3. Select the "Ports" tab, then click "Add Port".

3-4. Select "Local Port" then click "New Port".

3-5. In the "Port Name" window, enter the shared printer name following the format below, then click "OK" :

 Computer name of the Print server
 Shared printer name
REFERENCE
- The computer name of the print server is the "Full computer name" you confirmed in the Step 2-2.
- The shared printer name is the name you entered in "Share name" in the Step 1-3.
- If you cannot perform the connection successfully, the sharing setting between the print server and the client PC (the setting on the OS) may not be specified properly.
In this case, Microsoft recommends that the same accounts and passwords be added to all the computers on the network.
3-6. In the "Printer Port" window, select "Close", then click "Apply" → "Close" in "Printer ProPerties" .


The end of all the settings.
When the client PC is Windows Vista 32 bit and the print server is Windows 7 32 bit, or when the client PC is Windows Vista 64 bit and the print server is Windows 7 64 bit
Canon iP4700 Series is used as an example of the printer to be shared.
- Preparations -
Both Print server and Client PC must have either of the following drivers installed, namely the one downloaded from Canon website or the one included in the OS. Which driver you should install in depends on the printer / OS.
For details, see our website.
- To install the downloaded driver in the client PC, check "Select printer port" in the Installation Complete window, then select LPT1 in "Manual Selection" to complete the installation.
- To install the driver included in the OS in the client PC, select LPT1 in "Add Printer" to complete the installation.
1. Complete the printer sharing settings on the Printer server.
Let's make the printer connected to the print server available to other computers.
1-1. From the Start menu, select [Devices and Printers] .

REFERENCE
The screen looks different depending on the environment you are using.
1-2. Right-click the Canon iP4700 Series icon, then select "Printer Properties" .

1-3. Select the Sharing tab, check "Share this printer", and then enter the name of the printer you want to share in "Share name".
After you enter the name, click "Apply" then "OK" to close Properties.

IMPORTANT
- The iP4700 is an example.
- Make sure to write down the "words" you entered in Share name. You will need it when doing the setup for the client server.
1-4. Confirm that the following kind of mark is displayed in "State" in the bottom of the window.

2. This is necessary when you specify the printer in the step 3 below.
2-1. From the Start menu, right-click "Computer", then click "Properties".

2-2. Confirm the Full computer name.

IMPORTANT
"Print Server" is an example.
Make sure to write down the "words" in Full computer name. You will need it when doing the setup for the client server.
3. Add the printer to the client PC as a new printer.
Make the client PC recognize the printer on the network.
3-1. From the Start menu, select "Network", then "Add a printer".
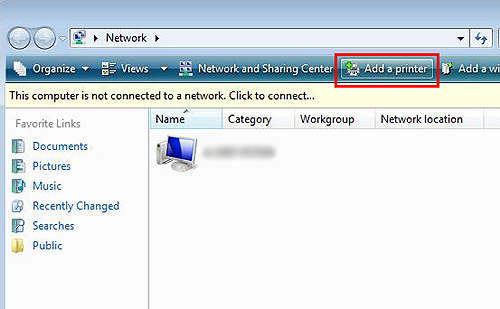
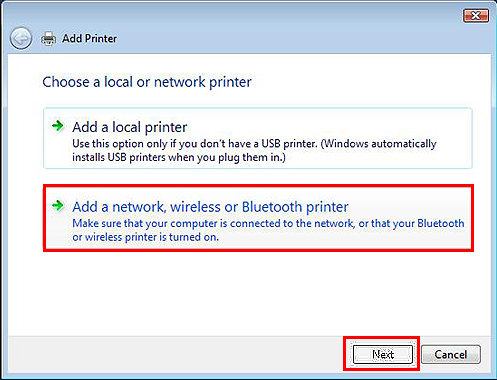
3-2. Select "Add a network, wireless or Bluetooth printer," then click Next.
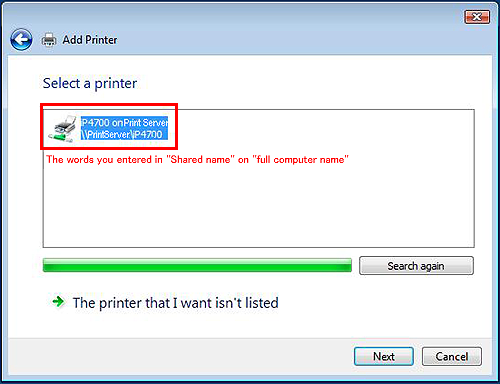
3-3. Click the icon of the printer specified on the print server, click "Next".
IMPORTANT
If the printer icon is not displayed, check the connection with the print server. If the problem persists, confirm whether the account (administrative privileges) of the print server is surely specified on the client PC.
(It may take time to display the printer icon.)
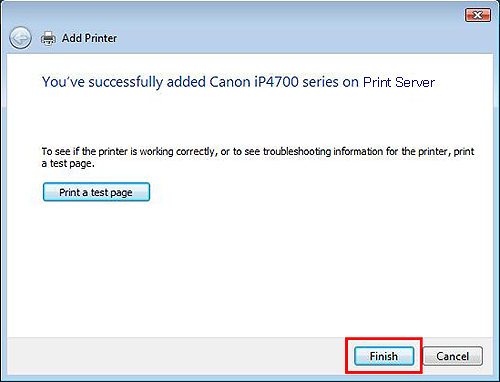
3-4. After following the instructions on the window, click "Finish".
The end of all the settings.
Canon iP4700 Series is used as an example of the printer to be shared.
- Preparations -
Both Print server and Client PC must have either of the following drivers installed, namely the one downloaded from Canon website or the one included in the OS. Which driver you should install in depends on the printer / OS.
For details, see our website.
- To install the downloaded driver in the client PC, check "Select printer port" in the Installation Complete window, then select LPT1 in "Manual Selection" to complete the installation.
- To install the driver included in the OS in the client PC, select LPT1 in "Add Printer" to complete the installation.
1. Complete the printer sharing settings on the Printer server.
Let's make the printer connected to the print server available to other computers.
1-1. From the Start menu, select "Control Panel", "Hardware and Sound", then "Printers".
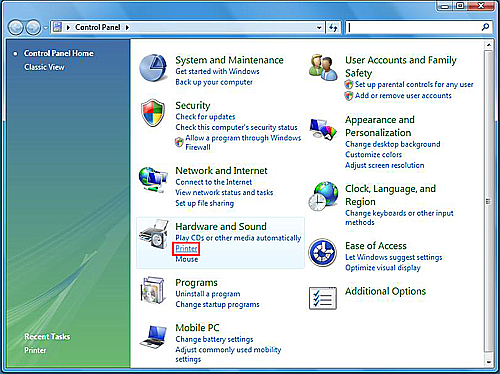
The Printer window is displayed.
REFERENCE
The screen looks different depending on the environment you are using.
1-2. Right-click the Canon iP4700 Series icon, then select "Sharing".
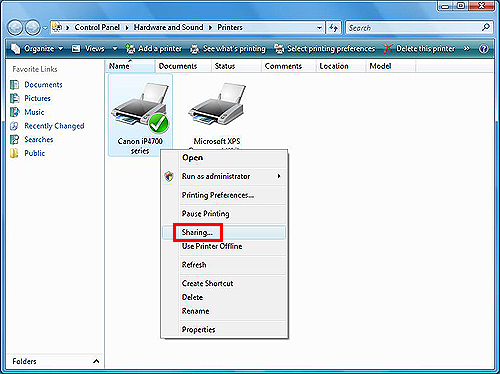
The Properties of the printer is displayed.
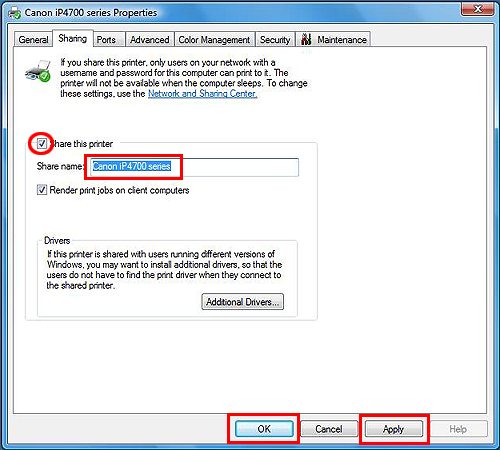
1-3. Click "Change sharing options" in the Sharing tab.

1-4. Select "Share this printer", then enter the name of the printer you want to share in "Share name".
Click "Apply" then "OK" to close Properties.
IMPORTANT
- The Canon iP4700 Series is an example.
- Make sure to write down the "words" you entered in Share name. You will need it when doing the setup for the client server.
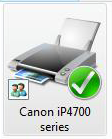
1-5. Confirm that the following kind of icon is displayed. In this case, the icon indicates that iP4700 series get ready to be shared.
2. Confirm the full computer name of the print server.
This is necessary when you specify the printer in the step 3 below.
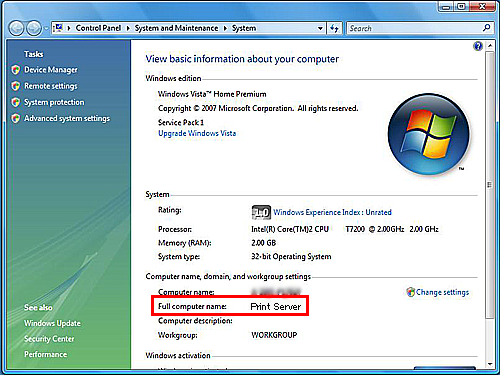
2-1. From the Start menu, right-click "Computer", then click "Properties".
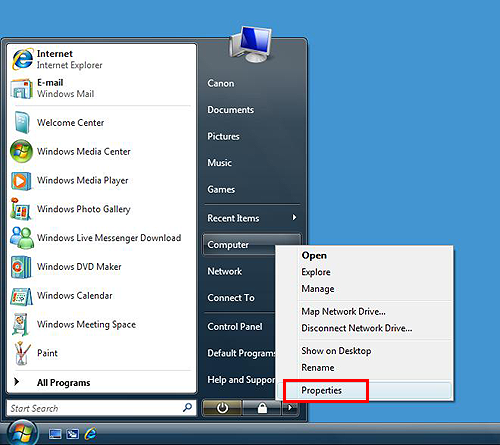
2-2. Confirm "Full computer name".
IMPORTANT
"Print Server" is an example.
Make sure to write down the "words" in Full computer name. You will need it when doing the setup for the client server.
3. Add the printer to the client PC as a new printer.
Make the client PC recognize the printer on the network.
3-1. From the Start menu, select "Computer", "Network", then "Add a printer".
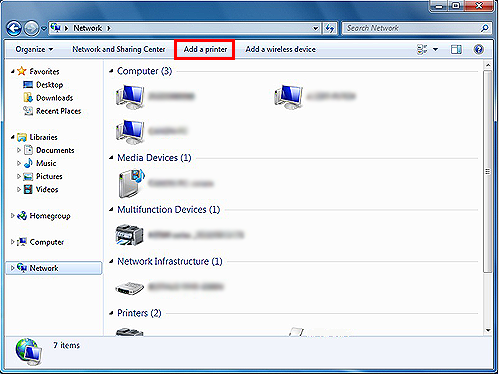
The Add Printer window is displayed.
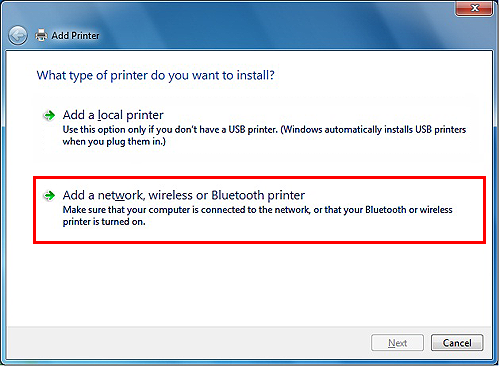
3-2. Select "Add a network, wireless or Bluetooth printer".
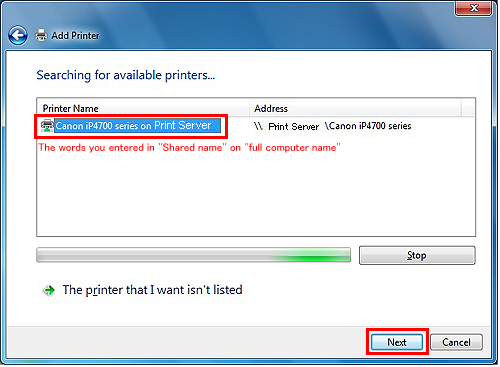
3-3. Click the icon of the printer shared on the print server, click "Next".
IMPORTANT
If the printer icon is not displayed, check the connection with the print server. If the problem persists, confirm whether the account (administrative privileges) of the print server is surely specified on the client PC.
(It may take time to display the printer icon.)
3-4. After following the instructions on the window, click "Finish".
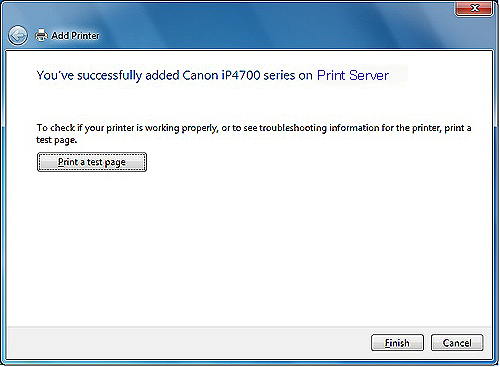
The end of all the settings.

