Shooting movies (EOS M)
23-Aug-2012
8201597600
Solution
This page describes how to shoot movies with the default settings.
IMPORTANT
When shooting movies, use a large-capacity SD card rated SD Speed Class 6 " " or higher. If you use a slow-writing card when shooting movies, the movie might not be recorded properly. And if you playback a movie on a card having a slow reading speed, the movie might not playback properly.
 " or higher. If you use a slow-writing card when shooting movies, the movie might not be recorded properly. And if you playback a movie on a card having a slow reading speed, the movie might not playback properly.
1. Set the Mode Dial to <  >, and then set the power to <ON>.
 >, and then set the power to <ON>.
2. Select [  ] (Movie auto exposure) for the shooting mode.
 ] (Movie auto exposure) for the shooting mode.
By default, [Movie Servo AF: Enable] is set for continuous focusing.
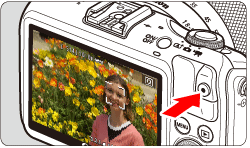
3. Press the <  > (Movie start/stop) button to start shooting a movie.
 > (Movie start/stop) button to start shooting a movie.
- While the movie is being shot, the "
 " mark will be displayed on the upper right of the screen.
 - While shooting a movie, be careful not to cover the microphone with your finger.

4. To stop shooting the movie, press the <  > (Movie start/stop) button again.
 > (Movie start/stop) button again.
CAUTION
- With certain lenses, focus cannot be achieved with AF. Focus manually instead.
- Do not point the camera-attached lens toward the sun. The sun’s heat can damage the camera’s internal components.
- If <
 > is set and the ISO speed or aperture changes during movie shooting, the white balance may also change.
 - If you shoot a movie under fluorescent or LED lighting, the movie may flicker.
- Zooming the lens during movie shooting is not recommended. Zooming the lens can cause changes in the exposure regardless of whether the lens' maximum aperture changes or not. Exposure changes may be recorded as a result.
NOTE
Recording and Image Quality
- The movie file format will be MOV.
- A movie file is recorded each time you shoot a movie. If the file size exceeds 4 GB, a new file will be automatically created.
- The maximum recording time of one movie clip is 29 min. 59 sec. If the movie shooting time reaches 29 min. 59 sec., the movie shooting will stop automatically. You can resume movie shooting by pressing the <
 > (Movie start/stop) button. (A new movie file is recorded.)
 - The sound will be recorded in stereo by the camera's built-in microphone.
- Most commercially-available external stereo microphones with a 3.5 mm diameter miniplug can be connected to the camera. If an external microphone has been connected to the camera’s external microphone IN terminal, it will be given priority the built-in microphone.
- If the Speedlite 90EX is attached, set the Speedlite's power to <OFF>.
Playback and TV connection
- If you connect the camera to a TV set and shoot a movie, the TV will not output any sound during the shooting. However, the sound will be properly recorded.
IMPORTANT
Internal Temperature Warning [  ] (in red)
 ] (in red)
- If the camera's internal temperature increases due to prolonged shooting or under a high ambient temperature, the red [
 ]icon will start blinking on the screen. This blinking icon indicates that the power will soon turn off automatically. If this happens, you will not be able to shoot again until the camera's internal temperature decreases. Turn off the power and let the camera rest for a while.
 - Shooting at a high temperature for a prolonged period will cause the[
 ] icon to appear earlier. When you are not shooting, turn off the camera.
 - Shooting high ISO speed images or long exposures while the camera's internal temperature is high, may result in degraded image quality.